|
 |
|
 |
|
| Author |
Message |
Buch
Community Member

Joined: 27 Feb 2014
Posts: 1184
Location: Copenhagen, Denmark
|
 Posted: Tue Jun 20, 2017 1:39 pm Post subject: Posted: Tue Jun 20, 2017 1:39 pm Post subject: |
 |
|
Sweet! It looks very true to how the movement looks in the movie....
_________________
Monsieur, azonnal kövessen engem bitte |
|
| Back to top |
|
|
|
|
 |
|
 |
|
|
|
|
| Author |
Message |
Vader
Community Member

Joined: 19 Feb 2011
Posts: 267
Location: Sweden
|
| Posted: Fri Jun 30, 2017 3:19 pm Post subject: |
|
|
I think that's just so bloody brilliant, on so many different levels...!
I mean, for one thing, the animation you've already achieved looks absolutely great! Just tweak the details, and you should be there.
But then there's how your solution shows so well what how our world has changed between when the movie was made and now, just a couple of years from the time the movie ostensibly depicts.
Back then, the "obvious" way to solve a motion like this seems by all indications to have been a cam disc and a DC motor.
Today, we solve the same animation by taking a microcontroller and a servo — something that at that time was pure science fiction, literally!
Congrats, LearnByMaking! I look forward to seeing where your build goes from here...!
_________________
26354 |
|
| Back to top |
|
|
|
|
|
|
|
|
|
|
|
| Author |
Message |
8th_Passenger
Community Member

Joined: 28 Nov 2009
Posts: 443
Location: Hertfordshire, UK
|
| Posted: Sun Jul 16, 2017 3:56 am Post subject: |
|
|
Great work LearnByMaking.
Nice solution.
Looking forward to the next update.
Colin
_________________
Ripley: What's it key on?
Ash: Micro changes in air density. |
|
| Back to top |
|
|
|
|
|
|
|
|
|
|
|
| Author |
Message |
Bwood
Community Member
Joined: 20 Sep 2009
Posts: 843
|
|
| Back to top |
|
|
|
|
|
|
|
|
|
|
|
| Author |
Message |
joberg
Community Member
.jpg)
Joined: 06 Oct 2008
Posts: 9447
|
| Posted: Tue Jul 18, 2017 8:24 am Post subject: |
|
|
TFS Bwood...possible is the operative word  |
|
| Back to top |
|
|
|
|
|
|
|
|
|
|
|
| Author |
Message |
LearnByMaking
Community Member

Joined: 31 Jan 2017
Posts: 63
Location: USA, Illinois
|
| Posted: Thu Jul 20, 2017 7:54 pm Post subject: |
|
|
Current VK Build Status and next steps :
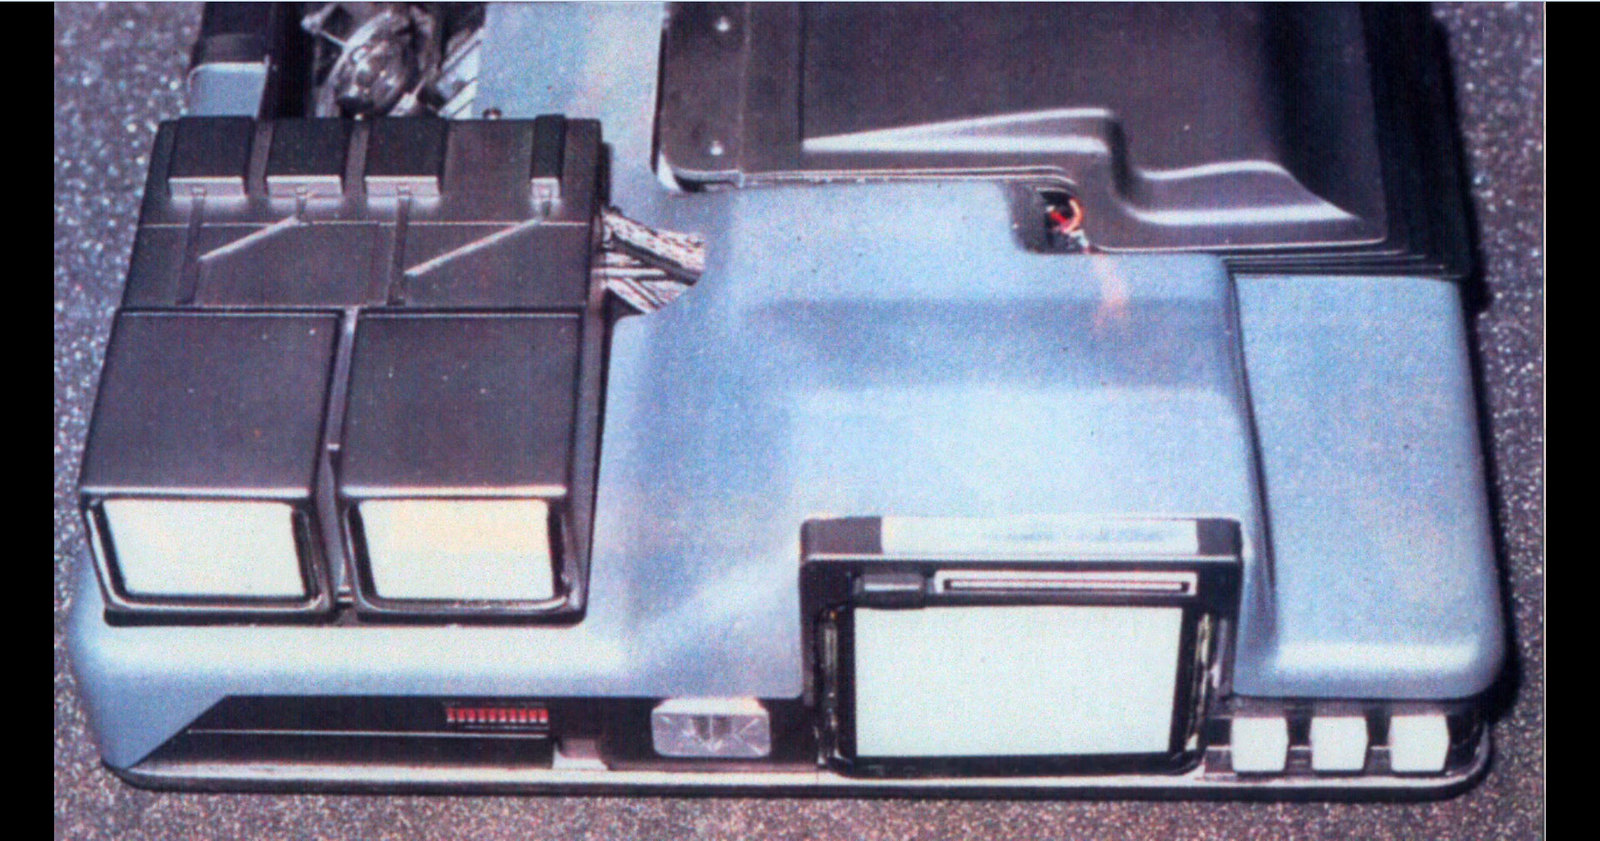
I finally settled on a width of 415-430mm, and I'm sticking with that... for now. With that dimension settled on I've been able to make decisions on the screens/displays (available screen dimensions with 4:3 aspect ratios also played a direct role).
The smaller screens will be 2.5” diagonal. I currently have 2 screens that I'm working with, both are 2.5” diagonal LCD's with 4:3 aspect ratio. The first is a hand held CCTV tester and takes component video (NTSC/PAL) that I found on eBay for about $20 (including shipping) – just need to pull it out of it's casing. The second screen I've been experimenting with comes from a “Dash Cam Pro” that I got new for about $20. I've been looking for a way to stream video to the display (including looking for driver boards that support component video or even a serial data connection). So far I haven't had much success but I'm still looking into it since other versions of this product can be found online for under $10.
The larger screen (that shows the subjects eye) will be 5” diagonal (3:4 aspect ratio) with component video input supporting NTSC/PAL formats – this I had to order from a supplier in China
I've also just about finished my vacuum former to make the Bellows (should have the polystyrene sheets by the end of the week – still need to work out a piece to form them from though).
_________________
If only you could see the things I've seen with your eyes. |
|
| Back to top |
|
|
|
|
|
|
|
|
|
|
|
| Author |
Message |
joberg
Community Member
Joined: 06 Oct 2008
Posts: 9447
|
| Posted: Fri Jul 21, 2017 7:53 am Post subject: |
|
|
Good news...sorta   Yes, that's the machine from Hell, but you're making headway and that's the main thing. Yes, that's the machine from Hell, but you're making headway and that's the main thing.
Sticking to the 415/430 measurement is the way to go (I know, I know...I'm biased concerning this machine  ) )
Eager to see how your bellows are going to be done! |
|
| Back to top |
|
|
|
|
|
|
|
|
|
|
|
| Author |
Message |
LearnByMaking
Community Member
Joined: 31 Jan 2017
Posts: 63
Location: USA, Illinois
|
| Posted: Mon Sep 04, 2017 10:01 pm Post subject: |
|
|
Still working at it, despite 2 separate laptops kicking it as well as a variety of other issues.
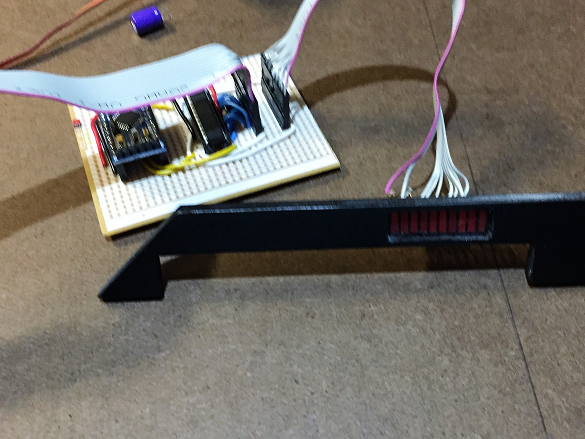
Re-designed the control board for the LED bargraph's (to simplify the circuit and reduce the number of parts needed). Currently it's not pretty but it functions the way it's supposed to. Also redesigned the mounts to hold the LED's in both bargraphs.


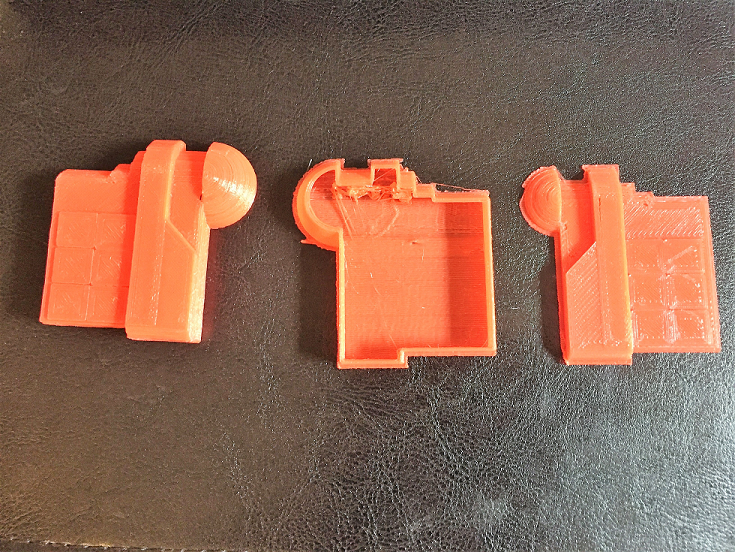
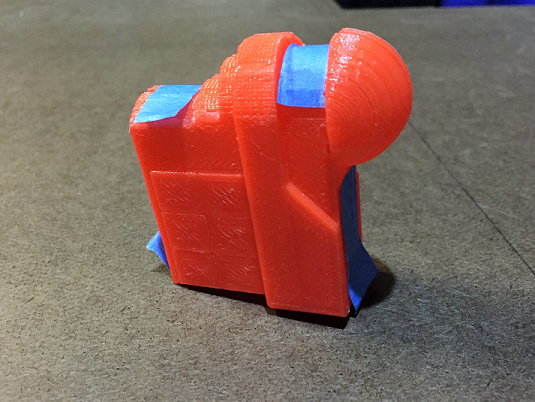
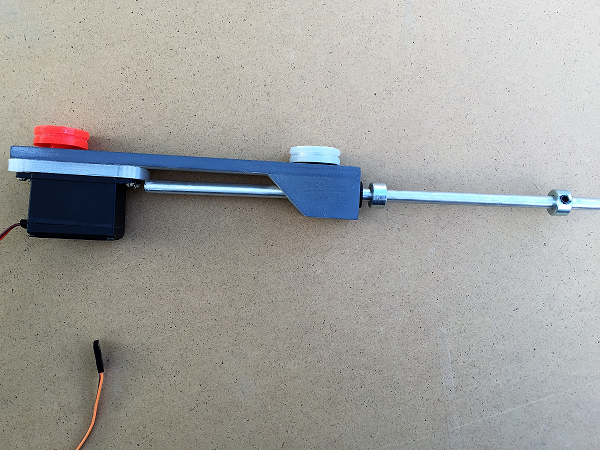
I've been able to improve the 3D model of the servo box. Currently, I plan to add the ridges by cutting and gluing styrene (2mm diameter tubing cut in half). I've had to print each side as two pieces and glue/weld them together using methylene chloride (I mainly use PLA plastic in my 3D printer). Once I have it all built up I plan on making a silicone mold and casting the two side in resin (keeping it hollow).

Last but not least, I'm making some good progress on the bellows (after I few failed attempts). Initially I modeled a bellow out of oil based clay (it wasn't perfect but close to what I wanted). When I vacu-formed it the clay became stuck in the styrene so that killed that model. Next I moved to using wood to make a master form for the bellows. After a few attempts I think I've just about got it (after some more sanding and bondo).


_________________
If only you could see the things I've seen with your eyes. |
|
| Back to top |
|
|
|
|
|
|
|
|
|
|
|
| Author |
Message |
joberg
Community Member
Joined: 06 Oct 2008
Posts: 9447
|
| Posted: Tue Sep 05, 2017 6:25 am Post subject: |
|
|
Good progress...as for the ridges on the piece holding the eye, don't bother cutting pieces of styrene, they simply used sheets of corrugated plastruc (you can find those at your local hobby store).
Yes, vacu-forming has its challenges; your last form seems to be o.k. (it should be a little more elevated to make sure that no "webbing" occurs.
The quality of your buck = the quality of your pull, simple as that
Keep up the great work, we're all rooting for you! |
|
| Back to top |
|
|
|
|
|
|
|
|
|
|
|
| Author |
Message |
TM
Community Member
Joined: 06 Mar 2009
Posts: 201
|
| Posted: Wed Sep 06, 2017 9:31 pm Post subject: |
|
|
What a complicated prop! You have been doing a great job, please keep it up!
Tony
_________________
If only you could see what I've seen with your eyes. . . |
|
| Back to top |
|
|
|
|
|
|
|
|
|
|
|
| Author |
Message |
LearnByMaking
Community Member
Joined: 31 Jan 2017
Posts: 63
Location: USA, Illinois
|
| Posted: Thu Sep 07, 2017 2:15 pm Post subject: |
|
|
Thanks for the encouragement Joberg and TM.
Special thanks to Joberg - before I got the styrene half cylinder pieces I was looking at a model shop for metal siding pieces (for model railroad building) but couldn't find anything. Because of your comment I decided to go to another hobby store (farther away from me) and they actually had the corrugated metal siding material. I could only find "Evergreen" material (they had "Plastruct" but not the corrugated metal siding).
_________________
If only you could see the things I've seen with your eyes. |
|
| Back to top |
|
|
|
|
|
|
|
|
|
|
|
| Author |
Message |
Nexus7
Community Member

Joined: 13 Sep 2014
Posts: 440
Location: New York Metro Area
|
| Posted: Thu Sep 07, 2017 6:17 pm Post subject: |
|
|
| Really amazing work. It's been very cool to see the progress. Thanks for sharing! |
|
| Back to top |
|
|
|
|
|
|
|
|
|
|
|
| Author |
Message |
joberg
Community Member
Joined: 06 Oct 2008
Posts: 9447
|
| Posted: Fri Sep 08, 2017 7:02 am Post subject: |
|
|
LearnByMaking: no need of metal siding, that product exist in plastic sheets.
10'' X 5" if I'm not mistaken |
|
| Back to top |
|
|
|
|
|
|
|
|
|
|
|
| Author |
Message |
LearnByMaking
Community Member
Joined: 31 Jan 2017
Posts: 63
Location: USA, Illinois
|
| Posted: Tue Sep 12, 2017 10:44 pm Post subject: |
|
|
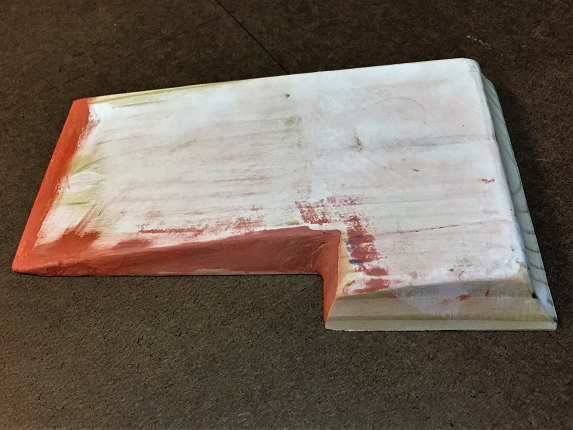
Almost done work on the Bellow's. Finished my form and mounted to a 1/4" thick piece of hardboard.

Finally took the leap today and vac-formed a set of bellow's (my first successful attempt at vac-forming). Here's what I got:

and here are all 5 forms stacked on top of each other:
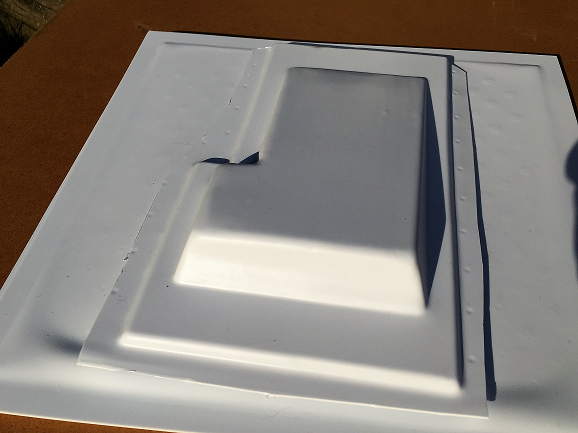
They all still need to be cut out (including the slots in the top for the lever arm) and painted.
I've made some progress on the servo box (the part connected to the "eye") and I'm continuing to work on filling in the lines from 3D printing and making an overall smoother finish. Also I still need to add some pieces to this part (I have them made but haven't attached them yet).
In addition, my model of the lower arm portion is coming along with a few revisions (one simple one being the addition of a 608 skate bearing inside the upper pulley so that it rotates more smoothly).
Sorry, Joberg, I did a poor job describing the plastic material – it is "patterned to look like metal siding" for models but it is made of styrene (I couldn't find that pattern for Plastruct brand locally, just the Evergreen brand) so I think it is the same as you were describing. Here's a picture of the packaging:

_________________
If only you could see the things I've seen with your eyes. |
|
| Back to top |
|
|
|
|
|
|
|
|
|
|
|
| Author |
Message |
joberg
Community Member
Joined: 06 Oct 2008
Posts: 9447
|
| Posted: Wed Sep 13, 2017 6:24 am Post subject: |
|
|
Good progress! Yes, congrats on those first pulls (vac-form) if you experience some difficulties with the suction (I don't know what type of vac you have) you can always have a heat gun handy (with gloves of course) and heat the plastic (still being pulled by your vac) while passing your fingers on the edges of your bellow to have maximum details (experimentation is a must of course )
Servo-box is getting there and yes, those corrugated plastic sheets are it!
Keep up the good job!! |
|
| Back to top |
|
|
|
|
|
|
|
|
|
|
|
| Author |
Message |
8th_Passenger
Community Member
Joined: 28 Nov 2009
Posts: 443
Location: Hertfordshire, UK
|
| Posted: Mon Sep 18, 2017 3:33 pm Post subject: |
|
|
All looking good LearnByMaking.
Colin
_________________
Ripley: What's it key on?
Ash: Micro changes in air density. |
|
| Back to top |
|
|
|
|
|
|
|
|
|
|
|
| Author |
Message |
LearnByMaking
Community Member
Joined: 31 Jan 2017
Posts: 63
Location: USA, Illinois
|
| Posted: Thu Sep 28, 2017 9:16 pm Post subject: |
|
|
I've been busy working on developing programming to support running the VK (fairly steep learning curve - I've got a slightly better handle on electrical design than programming - but both are works in progress).
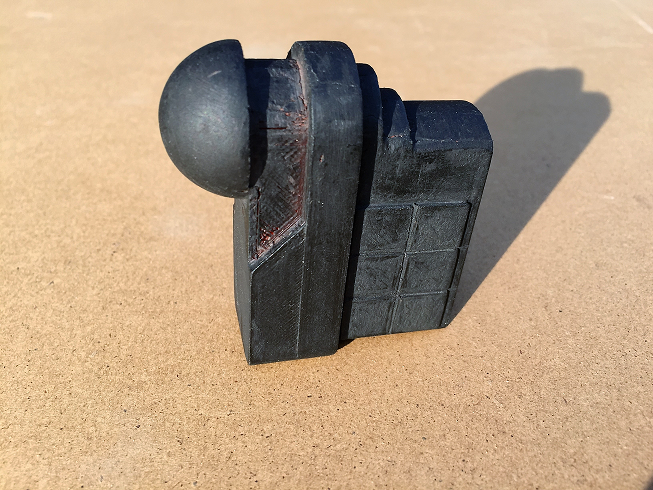
Anyway, I finally have some Bellows that are cut, filed, sanded and painted:

Here they are stacked up (with some foam spacers):

I left the "tail ends"a bit long since I still need to figure out how I should hinge them (suggestions?).
My goal for the Bellow's is to make them a discrete part / module, so they can be dropped in and plugged in (currently just a 3 pin servo cable).
Thanks again for the support and encouragement!
_________________
If only you could see the things I've seen with your eyes. |
|
| Back to top |
|
|
|
|
|
|
|
|
|
|
|
| Author |
Message |
Buch
Community Member
Joined: 27 Feb 2014
Posts: 1184
Location: Copenhagen, Denmark
|
| Posted: Fri Sep 29, 2017 2:27 am Post subject: |
|
|
Those look like the real deal 
_________________
Monsieur, azonnal kövessen engem bitte |
|
| Back to top |
|
|
|
|
|
|
|
|
|
|
|
| Author |
Message |
8th_Passenger
Community Member
Joined: 28 Nov 2009
Posts: 443
Location: Hertfordshire, UK
|
| Posted: Fri Sep 29, 2017 1:57 pm Post subject: |
|
|
They look great LearnByMaking.
What thickness styrene did you use?
Will they have enough flex to hinge? Or are you going to cut them
at the hinge point and reconnect them with a thin fabric or tape hinge?
I hope that makes sense.
Colin
_________________
Ripley: What's it key on?
Ash: Micro changes in air density. |
|
| Back to top |
|
|
|
|
|
|
|
|
|
|
|
| Author |
Message |
LearnByMaking
Community Member
Joined: 31 Jan 2017
Posts: 63
Location: USA, Illinois
|
| Posted: Fri Sep 29, 2017 10:40 pm Post subject: |
|
|
I used fairly thick styrene sheets – 0.06” (1.524mm). Primarily, I used sheets this thick due to how the bellows looked in different views of the machine:


The other reason I used thick sheets was just due to never having done vac-forming before (I did a fair amount of research and even built my own rig but recommendations on thickness of sheets used in vac-forming was a bit elusive – I have a tendency to look for the technical specifics before I just try stuff, even though I find that I just have to experiment using what I have available).
My basic 2D size and shape are based, in part, on your drawings (the 3rd dimension is based mostly on stills).
This thickness of styrene definitely does not have the flex to hinge so, I'm looking at other methods to allow the movement.
Please tell me that you're making progress on your build – your design and construction efforts look so amazing – I'm especially impressed with your exploded views of the assembly for the 2 small screens.
_________________
If only you could see the things I've seen with your eyes. |
|
| Back to top |
|
|
|
|
|
|
|
|
|
|
|
|
You cannot post new topics in this forum
You cannot reply to topics in this forum
You cannot edit your posts in this forum
You cannot delete your posts in this forum
You cannot vote in polls in this forum
|
|
|
|
|
|
|
|