|
 |
|
 |
|
| Author |
Message |
hirohawa
Community Member

Joined: 18 May 2006
Posts: 1067
|
 Posted: Thu Jan 28, 2016 6:41 pm Post subject: Posted: Thu Jan 28, 2016 6:41 pm Post subject: |
 |
|
Incredible!
I don't know if I missed it or it has been announced yet but how much will the kits be? |
|
| Back to top |
|
|
|
|
 |
|
 |
|
|
|
|
| Author |
Message |
spinner 44
Community Member

Joined: 06 Nov 2006
Posts: 202
Location: Madrid, Spain
|
| Posted: Sat Jan 30, 2016 10:58 am Post subject: |
|
|
PM sent in, asking payment, price and release details  |
|
| Back to top |
|
|
|
|
|
|
|
|
|
|
|
| Author |
Message |
Velvet Morning
Community Member
Joined: 18 Nov 2011
Posts: 132
Location: San Francisco
|
| Posted: Sat Jan 30, 2016 11:33 am Post subject: |
|
|
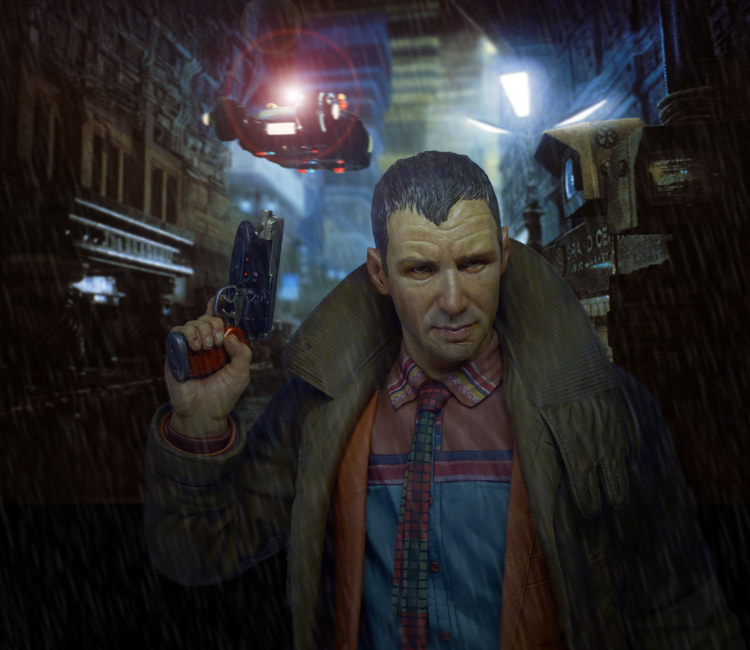
WOW! You nailed it with the rain effect!
Best- S. |
|
| Back to top |
|
|
|
|
|
|
|
|
|
|
|
| Author |
Message |
Bwood
Community Member
Joined: 20 Sep 2009
Posts: 843
|
| Posted: Sat Jan 30, 2016 12:38 pm Post subject: |
|
|
| Incomparable. Thanks for giving all of us the opportunity to strive for something so exquisite. |
|
| Back to top |
|
|
|
|
|
|
|
|
|
|
|
| Author |
Message |
tinylight
Community Member
Joined: 19 Aug 2015
Posts: 29
Location: UK
|
| Posted: Thu Feb 04, 2016 3:05 pm Post subject: |
|
|
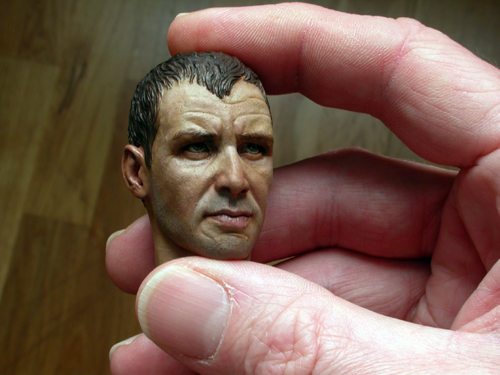
I was feeling quite nervous about painting the head, which is why I seemed to have left it nearly till the end of the project. I guess having to paint an actual person at a small scale and try not to make it look like it's 'painted' was adding to my trepidation, but also presenting me with a challenge I couldn't resist. Anyway, with some extra time found over the last few days I gathered my reference pics and my brushes and thought it was about time to push-ahead. (absolutely no pun intended!) 
Head primed.
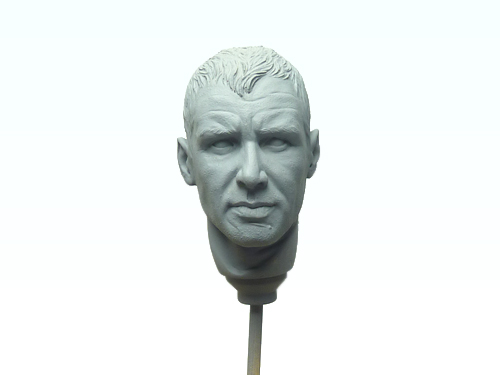
Entire head is airbrushed with a couple of coats of a pale flesh tone as a base colour. I'm keeping it pale as the next step relies on a certain amount of contrast.
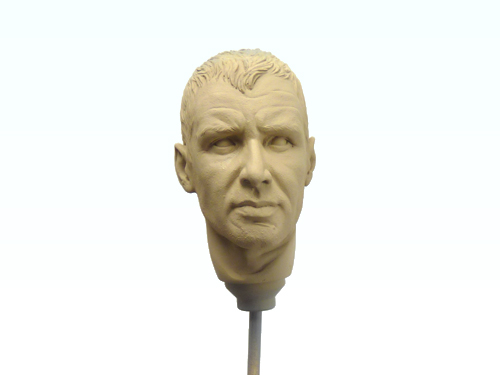
The face is airbrushed with a very fine 'scribble' of warm blush tones, this will help break up the flat areas of skin and show through subsequent layers. I have concentrated some of the warm tone around the lips, nose cheeks and ears.

The face is lightly airbrushed once more with transparent layers of the original base colour. Unfortunately the effect is very subtle and hardly noticeable in the photo, but the underlying 'scribble' shows through giving some nice variation in tone across the face.
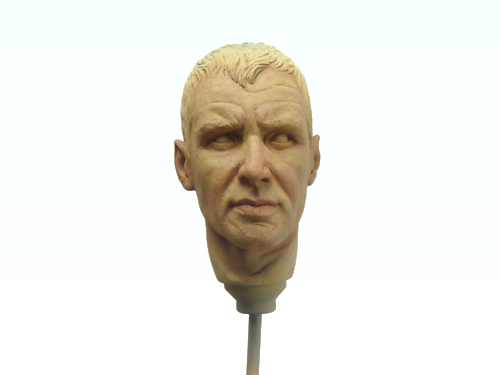
Returning to my brushes I have started to work back across the face with some transparent layers of warm blush tones. Again, concentrating around the nose, lips and cheeks and generally warming up the face. A little grey is blended into the stubble areas.
Hair and eyebrows are painted in and the contrast in the face is enhanced a little more with some subtle shading and highlighting.
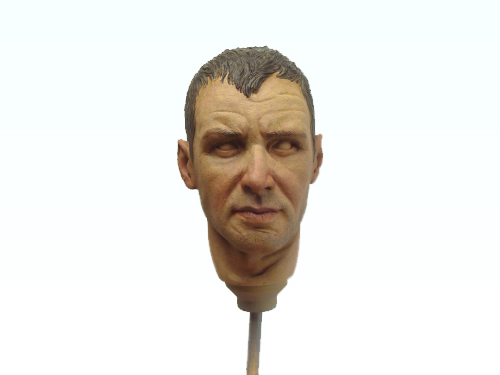
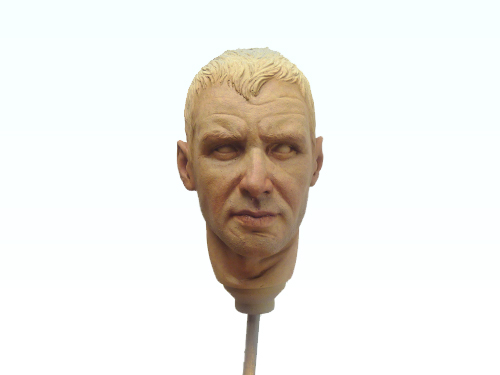
Details are painted in. Eyes are painted and given a couple of coats of high gloss lacquer, stubble area is darkened a little more and further shadows / highlights are carefully painted in. The head is given a very light misting with satin varnish to provide a sheen to the skin and take away some of the 'powdery-ness' of the matt paints, lips are given a little extra.
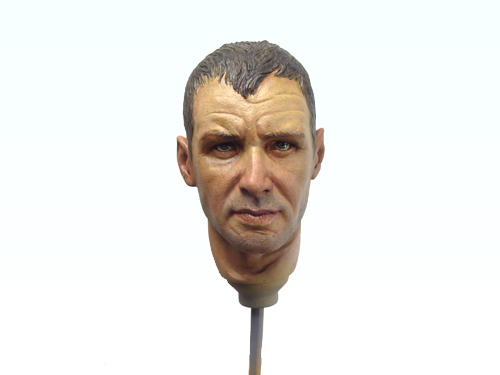
Finally a shot taken in natural light shows the contrast in the flesh tones a bit better.
Phew, just the hands, blaster and final assembly to go, hopefully…
Thanks to everyone who has shown an interest and contacted me with regards to the kits. I'll be putting a handful up for sale at the weekend in 'The Prop Shop' section of the forum. 
_________________
I make friends. They're toys. My friends are toys. I make them. It's a hobby. |
|
| Back to top |
|
|
|
|
|
|
|
|
|
|
|
| Author |
Message |
joberg
Community Member
.jpg)
Joined: 06 Oct 2008
Posts: 9447
|
| Posted: Thu Feb 04, 2016 7:12 pm Post subject: |
|
|
Man this is soooo good  I cannot contain myself much longer I cannot contain myself much longer  |
|
| Back to top |
|
|
|
|
|
|
|
|
|
|
|
| Author |
Message |
andy
Community Guide

Joined: 01 Nov 2006
Posts: 6237
Location: Rochester, NY
|
| Posted: Thu Feb 04, 2016 10:41 pm Post subject: |
|
|
Just way and above anything I have ever seen. Absolutely incredible work.
Andy |
|
| Back to top |
|
|
|
|
|
|
|
|
|
|
|
| Author |
Message |
spinner 44
Community Member
Joined: 06 Nov 2006
Posts: 202
Location: Madrid, Spain
|
| Posted: Sat Feb 06, 2016 5:11 am Post subject: |
|
|
Each one of your updates is a joy to see. I love your realistic flesh approach of building up tones and layers of transparency, instead of the classic volumetric they in classic figure paint, following just light and shadow.
I'll be checking the Prop Shop every hour |
|
| Back to top |
|
|
|
|
|
|
|
|
|
|
|
| Author |
Message |
tinylight
Community Member
Joined: 19 Aug 2015
Posts: 29
Location: UK
|
| Posted: Sat Feb 06, 2016 11:06 am Post subject: |
|
|
Deckard kits are finally up for sale...
http://propsummit.com/viewtopic.php?t=4923
_________________
I make friends. They're toys. My friends are toys. I make them. It's a hobby. |
|
| Back to top |
|
|
|
|
|
|
|
|
|
|
|
| Author |
Message |
Pro Mod
Community Member
Joined: 13 Aug 2010
Posts: 108
Location: Manchester, England
|
| Posted: Tue Feb 09, 2016 11:45 am Post subject: |
|
|
The only way this could be any more realistic would be if it was breathing!
Absolutely amazing piece of work from beginning to end!
You’ve done a man’s job sir! – Sorry couldn’t resist |
|
| Back to top |
|
|
|
|
|
|
|
|
|
|
|
| Author |
Message |
MarkHev
Community Member
Joined: 31 May 2009
Posts: 76
Location: Birmingham, UK
|
| Posted: Thu Feb 11, 2016 8:09 am Post subject: |
|
|
Mine arrived in under 48 hours, packed beautifully and safely. Its a work of art. Its well worth it if there are any left!
_________________
I've eaten things you people wouldn't believe |
|
| Back to top |
|
|
|
|
|
|
|
|
|
|
|
| Author |
Message |
joberg
Community Member
Joined: 06 Oct 2008
Posts: 9447
|
| Posted: Thu Feb 11, 2016 8:23 am Post subject: |
|
|
TFS Mark! Eager to see what you'll do with it (paint wise of course)  |
|
| Back to top |
|
|
|
|
|
|
|
|
|
|
|
| Author |
Message |
MarkHev
Community Member
Joined: 31 May 2009
Posts: 76
Location: Birmingham, UK
|
| Posted: Thu Feb 11, 2016 8:33 am Post subject: |
|
|
I'm scared to build it because there is no way I can get near the shots on the page. I'm at lunch trawling airbrushes as my twenty year old model Aztec
_________________
I've eaten things you people wouldn't believe |
|
| Back to top |
|
|
|
|
|
|
|
|
|
|
|
| Author |
Message |
tinylight
Community Member
Joined: 19 Aug 2015
Posts: 29
Location: UK
|
| Posted: Thu Feb 11, 2016 2:52 pm Post subject: |
|
|
MarkHev - Can I suggest the Iwata NEO, a real workhorse of an airbrush. I've really punished this poor thing over the years and as long as you keep it clean it just comes up with the goods every time.
Even though the project is drawing to a close it still seems to be throwing up some challenges...
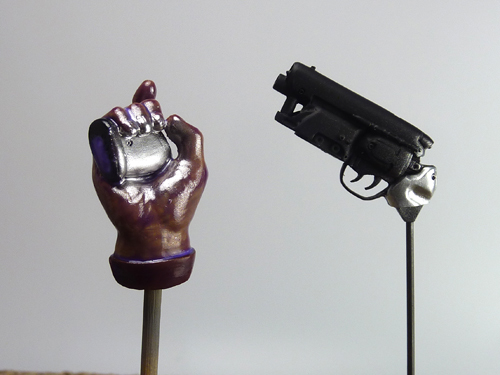
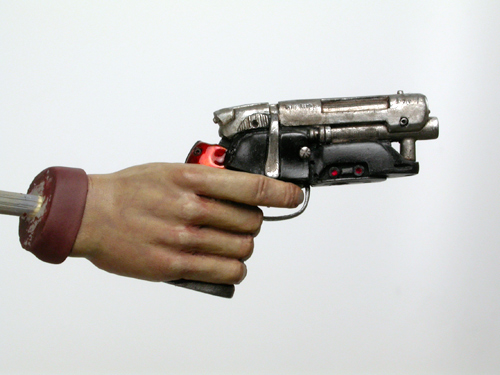
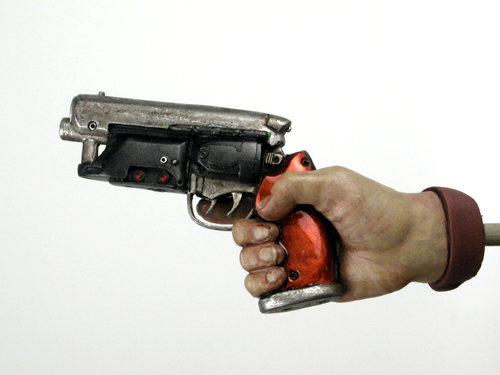
The hands have been painted with the same technique as the head, the blaster and the grip have been given a black undercoat. The hand has also been given a couple of protective coats of varnish for the next stage.
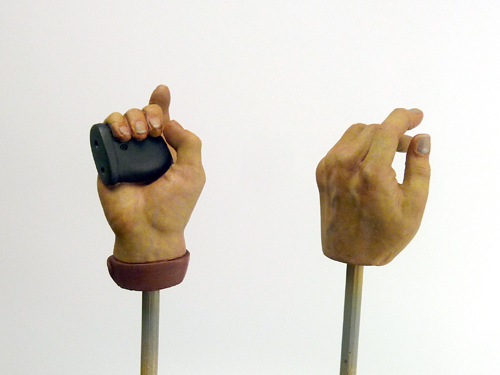
A problem I had been facing was how to paint the amber grips on the blaster. Short of casting the hand and blaster in transparent resin I wanted to be able to replicate the depth and richness of the translucent amber using just paint.
First the hand has been masked with a liquid latex mask and left to dry thoroughly. Then I airbrushed the grip with a chrome paint to give a nice reflective surface.
After carefully removing the masking I started to try and build up some depth with many thin coats of orange and brown inks. The inks are transparent and allow the chrome beneath to shine through. I gave the grips a layer of clear lacquer and again, once the lacquer had dried, proceeded with more of the inks by brushing on in a broken 'tortoise shell' pattern. Alternating between layers of lacquer and ink gave something of a three dimensional effect and while not as convincing and accurate as a truly translucent grip it seemed to do the job.
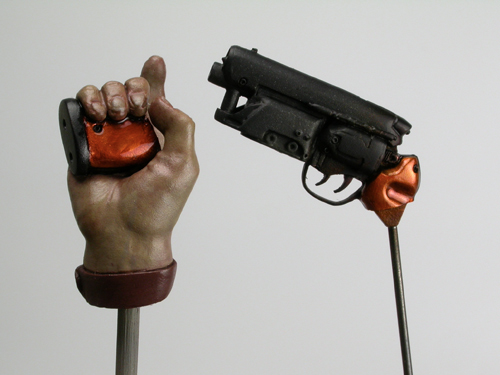
The metallic areas of the blaster were painted in a 'buffable' metallic paint. When it has dried it can be polished with a soft cloth into a convincing metallic sheen. I burnished it further and added some scratches and wear into the surface.
The bright shiny surface was weathered down with a few washes of thinned acrylic and ink. I worked back into the weathering with some scratching and buffing to make it a little brighter again. The black areas of the gun have been rubbed with a little graphite to give a slight sheen and pick out some of the details.
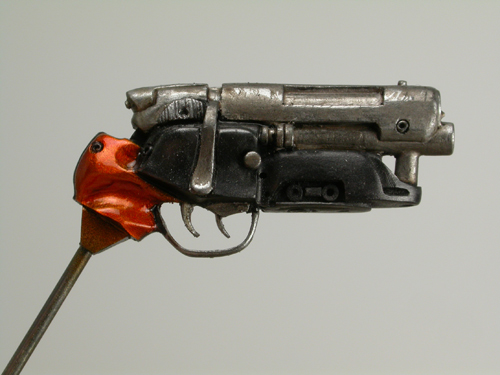
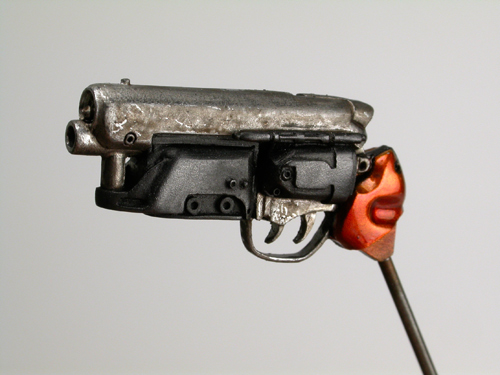
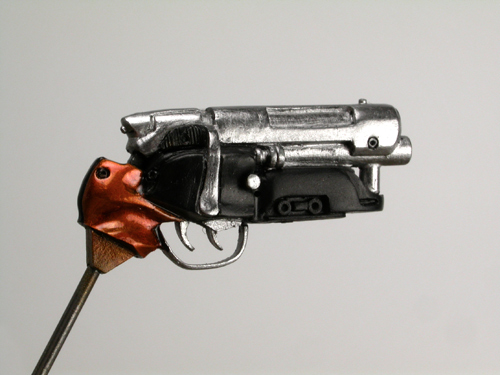
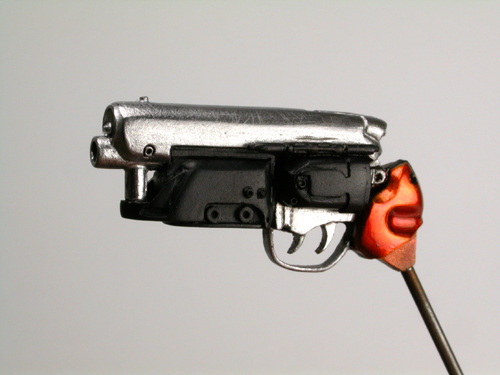
Blaster assembled. I went back over the blaster and picked out some highlights in the metallic areas and painted in the details. The grip was given a final coat of high gloss lacquer.
Just the final assembly left...
_________________
I make friends. They're toys. My friends are toys. I make them. It's a hobby. |
|
| Back to top |
|
|
|
|
|
|
|
|
|
|
|
| Author |
Message |
MarkHev
Community Member
Joined: 31 May 2009
Posts: 76
Location: Birmingham, UK
|
| Posted: Fri Feb 12, 2016 6:22 am Post subject: |
|
|
Hi thanks for the tip - I have just bought a NEO based on your recommendation and won an auction on a steel Aztek with compressor, and loads of extras for £112 on eBay.
As per my PM if you could post the exact brand/colours used I would be very grateful indeed!
Oh boy I'm back in modelling with a vengeance!
_________________
I've eaten things you people wouldn't believe |
|
| Back to top |
|
|
|
|
|
|
|
|
|
|
|
| Author |
Message |
Beardybloke
Community Member

Joined: 30 Jan 2015
Posts: 180
Location: Plymouth,uk
|
| Posted: Fri Feb 12, 2016 6:58 am Post subject: |
|
|
Could o ask Was it rub'n'buff that you used for the metal parts of the blaster or was it something else?
_________________
Tell him I'm eating.. |
|
| Back to top |
|
|
|
|
|
|
|
|
|
|
|
| Author |
Message |
joberg
Community Member
Joined: 06 Oct 2008
Posts: 9447
|
| Posted: Fri Feb 12, 2016 8:03 am Post subject: |
|
|
| Thanks for the tuto tinylight It's looking very good. Eager to see the "ensemble" being put together! |
|
| Back to top |
|
|
|
|
|
|
|
|
|
|
|
| Author |
Message |
tinylight
Community Member
Joined: 19 Aug 2015
Posts: 29
Location: UK
|
| Posted: Sat Feb 13, 2016 9:30 am Post subject: |
|
|
MarkHev - I'd love to be able to list all the colours I have used but to be honest I'm not quite sure myself! I always start a project with good intentions of being methodical and recording the paints and processes I use in a 'paint diary'. However once I get going the painting becomes quite intuitive and I'm generally using whatever looks ok rather than taking note of the exact colour. I rarely use anything straight from the tube/pot preferring to mix and match the colours to my reference materials, it's part of the fun and forces me to experiment. That said I generally use Tamiya Matt colours and Medea Com-Art through the airbrush and hand-paint with Vallejo Model Color, glazes and transparent effects are done with thinned W&N oil paint and drawing inks.
Beardybloke - The metallic areas on the blaster were painted with Mr Metal Color from GSI, Humbrol Metalcote will work equally as well.
The final assembly. As most of the build has been done throughout the painting process it just remains to attach the painted head and hands and the figure is complete. The figure is given a final 'once-over' and minor adjustments are made to some areas of weathering. Extra points of gloss on the toes of the shoes, a little darkening to the bottoms of the trouser legs and a subtle further sheen to the forehead are in-keeping with the impression of rain employed for the coat.
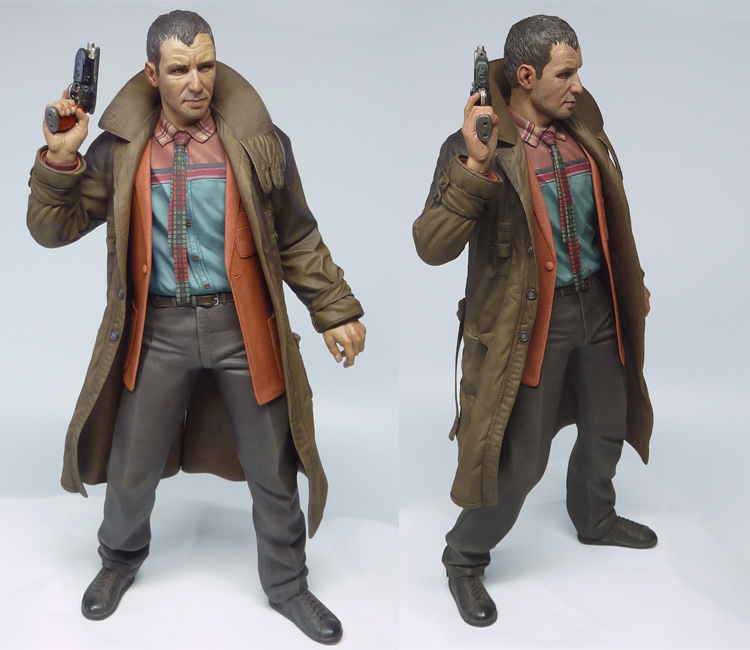
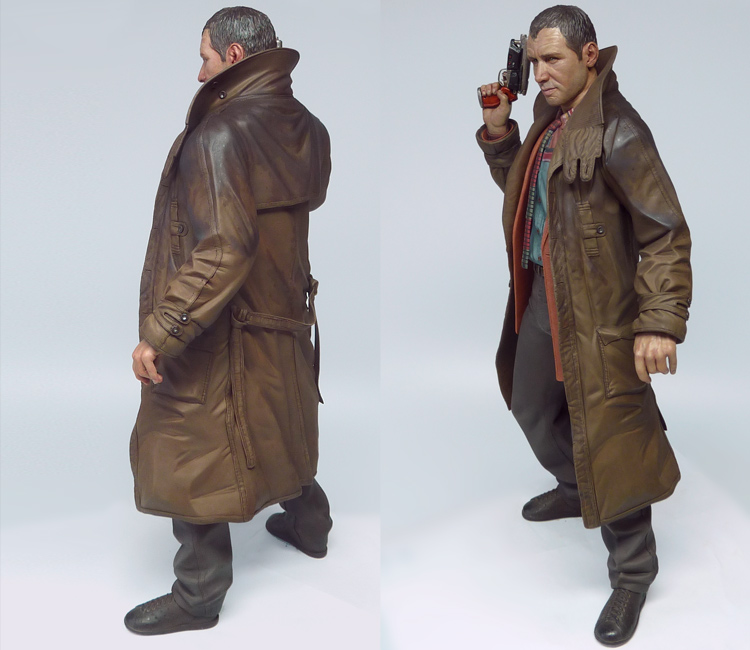
What started as a project to fill a gap in my figure collection and sharpen up a few skills has become something of a labour of love. I've had a great time sculpting and painting this figure over the last five months or thereabouts. I've learned a great deal throughout the project and there are definitely elements I would want to re-do and there are elements that have pleasantly surprised me. Sculpting a likeness was a massive challenge and working out how to paint a rain soaked coat was a bit of a 'head-scratcher' too, not to mention attempting to produce the figure as a kit halfway through the proceedings! However, without the encouragement and support of forum members I'm not sure I would have completed the project or enjoyed it half as much, so a huge thank you.
'Deck' seems to be in need of a companion now, I'll need a while to start collecting some more reference materials first though…dove or plastic rain-mac?
Sorry, couldn't resist.
_________________
I make friends. They're toys. My friends are toys. I make them. It's a hobby. |
|
| Back to top |
|
|
|
|
|
|
|
|
|
|
|
| Author |
Message |
MarkHev
Community Member
Joined: 31 May 2009
Posts: 76
Location: Birmingham, UK
|
| Posted: Sat Feb 13, 2016 9:48 am Post subject: |
|
|
Has to be the plastic rain mac as there's never been a 1/6 of her!
_________________
I've eaten things you people wouldn't believe |
|
| Back to top |
|
|
|
|
|
|
|
|
|
|
|
| Author |
Message |
Bwood
Community Member
Joined: 20 Sep 2009
Posts: 843
|
| Posted: Sat Feb 13, 2016 12:28 pm Post subject: |
|
|
Although I'm tempted to go with true love, Zhora would be the obvious choice...
Too ghastly for some I imagine, but this could be an interesting pose... ;-P
http://propsummit.com/upload/696/zhora_shot.jpg |
|
| Back to top |
|
|
|
|
|
|
|
|
|
|
|
|
You cannot post new topics in this forum
You cannot reply to topics in this forum
You cannot edit your posts in this forum
You cannot delete your posts in this forum
You cannot vote in polls in this forum
|
|
|
|
|
|
|
|