|
 |
|
 |
|
| Author |
Message |
eltee
Community Member
Joined: 31 Oct 2006
Posts: 437
Location: West Coast USA
|
 Posted: Tue Jul 12, 2016 2:11 pm Post subject: Posted: Tue Jul 12, 2016 2:11 pm Post subject: |
 |
|
| joberg wrote: | Great update on that shooter eltee! It is a very technical and precise work you`re doing and there's no room for mistake it seems.
Good to see that Rich's bolt assembly is fitting nicely into a real Steyr.
Keep up the great work  |
Thanks, but my friend who has the machine shop is doing the actual machining work. Rich and I are guiding him through the process as he is not a prop guy and wouldn't know a Bladerunner from a Roadrunner.
The Steyr SL uppers are very rare, it was a small production and to my knowledge never redone by Steyr. I was just very lucky that a fellow enthusiast made one available to me. Hence, we are trying to go slowly and carefully.
At least we are in the home stretch. |
|
| Back to top |
|
|
|
|
 |
|
 |
|
|
|
|
| Author |
Message |
eltee
Community Member
Joined: 31 Oct 2006
Posts: 437
Location: West Coast USA
|
| Posted: Tue Jul 26, 2016 12:56 pm Post subject: |
|
|
The 3 main holes were drilled into one of the Steyrs, no errors. Next we'll do the other receiver. Two of the holes had to be very precise because they are very visible and are used to lock in the Steyr to the Bulldog below. They required counter sinking and correct alignment.
Getting very close to wrapping up work on the receivers. Next, modifying the the Steyr bolt assembly which is going to be tough but only a part of it shows. |
|
| Back to top |
|
|
|
|
|
|
|
|
|
|
|
| Author |
Message |
joberg
Community Member
.jpg)
Joined: 06 Oct 2008
Posts: 9463
|
| Posted: Wed Jul 27, 2016 6:53 pm Post subject: |
|
|
| TfS eltee; eager to see your next pics. |
|
| Back to top |
|
|
|
|
|
|
|
|
|
|
|
| Author |
Message |
eltee
Community Member
Joined: 31 Oct 2006
Posts: 437
Location: West Coast USA
|
| Posted: Mon Aug 01, 2016 12:20 pm Post subject: |
|
|
| joberg wrote: | | TfS eltee; eager to see your next pics. |
Will try to take some pics today or tomorrow. Very happy that both receivers turned out well and with no damage. Having a skilled machinist with an industrial grade shop was the key, IMHO.
Working on my bolt assembly at this point. Only a portion of the original Steyr bolt is used, we'll try to create the rest out of aluminum. I want to really get the pointy end that many incorrectly describe as the "firing pin" to match closeup pics. |
|
| Back to top |
|
|
|
|
|
|
|
|
|
|
|
| Author |
Message |
eltee
Community Member
Joined: 31 Oct 2006
Posts: 437
Location: West Coast USA
|
| Posted: Thu Aug 04, 2016 12:13 am Post subject: |
|
|
Here are the two Steyr receivers, DONE. Test fitted over my Bulldog, perfect.
 |
|
| Back to top |
|
|
|
|
|
|
|
|
|
|
|
| Author |
Message |
eltee
Community Member
Joined: 31 Oct 2006
Posts: 437
Location: West Coast USA
|
| Posted: Thu Aug 04, 2016 12:15 am Post subject: |
|
|
We used Rich Coyle's excellent replica receivers to determine where to make cuts and drill / countersink holes.
 |
|
| Back to top |
|
|
|
|
|
|
|
|
|
|
|
| Author |
Message |
eltee
Community Member
Joined: 31 Oct 2006
Posts: 437
Location: West Coast USA
|
| Posted: Thu Aug 04, 2016 12:17 am Post subject: |
|
|
Trimming out the Bolt End Caps was difficult due to having no flat surfaces by which to secure it in the milling machine. It got figured out and here is the real Steyr end cap and the Coyle end cap.
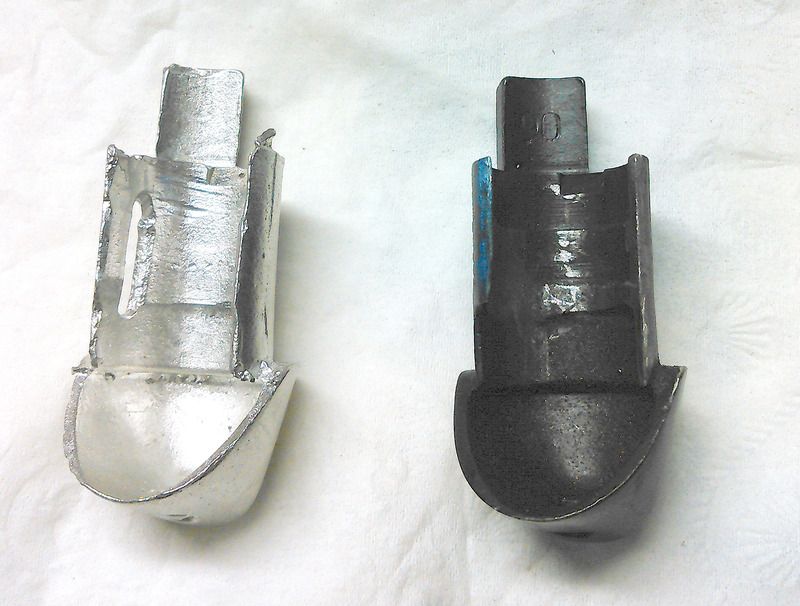
Here's how they looked originally.
Last edited by eltee on Thu Aug 04, 2016 12:22 am; edited 1 time in total |
|
| Back to top |
|
|
|
|
|
|
|
|
|
|
|
| Author |
Message |
eltee
Community Member
Joined: 31 Oct 2006
Posts: 437
Location: West Coast USA
|
| Posted: Thu Aug 04, 2016 12:21 am Post subject: |
|
|
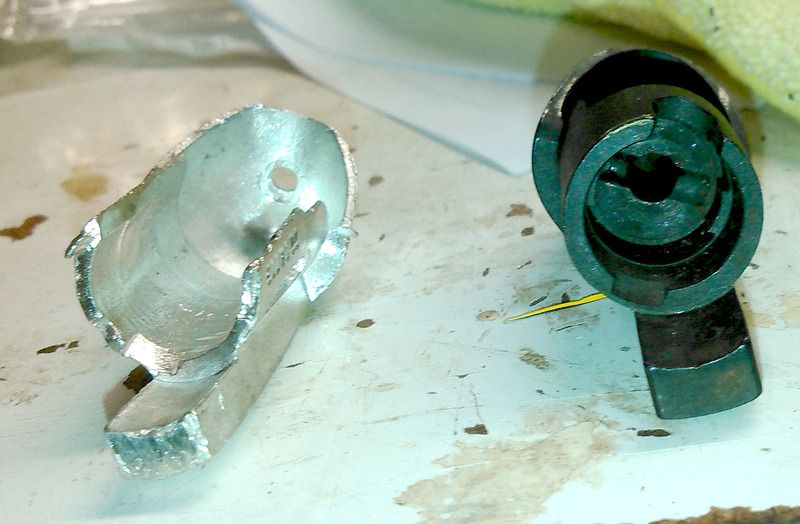
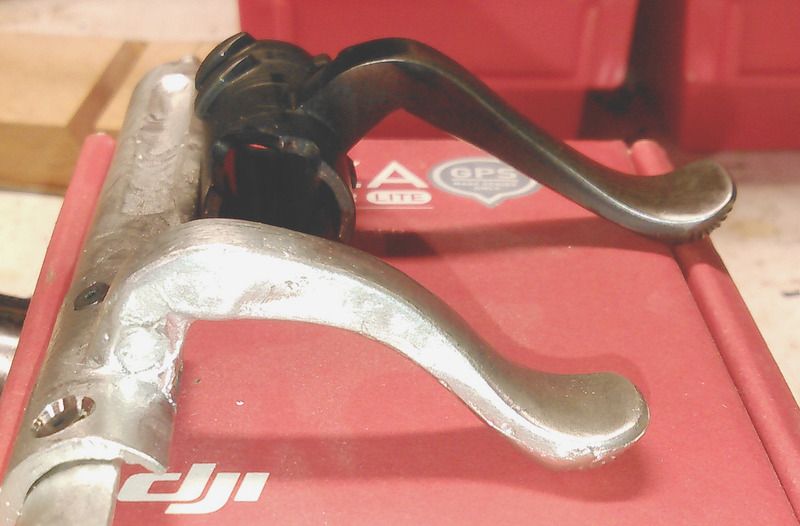
I have to bend my Steyr bolt handle to match the prop. It was bent to clear the cylinder of the Bulldog. People have been bending bolt handles for years, usually to clear a scope. That's my next step. Here's my Steyr and a Coyle bolt handle, you can see the difference.
 |
|
| Back to top |
|
|
|
|
|
|
|
|
|
|
|
| Author |
Message |
hirohawa
Community Member

Joined: 18 May 2006
Posts: 1067
|
| Posted: Thu Aug 04, 2016 4:15 am Post subject: |
|
|
| Excellent! |
|
| Back to top |
|
|
|
|
|
|
|
|
|
|
|
| Author |
Message |
Staar
Community Member

Joined: 04 Feb 2008
Posts: 757
Location: AUSTRALIA
|
| Posted: Thu Aug 04, 2016 4:23 am Post subject: |
|
|
This is fabulous, Thanks for sharing mate..
Highest regards
MARK
_________________
 |
|
| Back to top |
|
|
|
|
|
|
|
|
|
|
|
| Author |
Message |
veektohr
Community Member
Joined: 26 Feb 2016
Posts: 237
Location: Los Angeles
|
| Posted: Thu Aug 04, 2016 6:04 pm Post subject: |
|
|
| Dang, I blinked and you're almost done with the scary stuff! Catching up with this thread kind of renews my thirst for a real-parts build. Getting a vintage 3" bulldog has proved a challenge here in CA, though, since only the newer 2.5" version is on the approved handguns roster... |
|
| Back to top |
|
|
|
|
|
|
|
|
|
|
|
| Author |
Message |
racprops
Community Member

Joined: 30 Oct 2006
Posts: 2450
Location: Phoenix AZ
|
| Posted: Thu Aug 04, 2016 6:09 pm Post subject: |
|
|
| veektohr wrote: | | Dang, I blinked and you're almost done with the scary stuff! Catching up with this thread kind of renews my thirst for a real-parts build. Getting a vintage 3" bulldog has proved a challenge here in CA, though, since only the newer 2.5" version is on the approved handguns roster... |
That is a NO Problem as you need a 4.5 custom made barrel anyway...
Rich
_________________
I never have enough time to do all I want to do! |
|
| Back to top |
|
|
|
|
|
|
|
|
|
|
|
| Author |
Message |
veektohr
Community Member
Joined: 26 Feb 2016
Posts: 237
Location: Los Angeles
|
| Posted: Thu Aug 04, 2016 6:15 pm Post subject: |
|
|
True, but the difference in the receivers between the older 3" and newer 2.5" Bulldogs would nag at me. It's that "unused" hole behind the first trigger pin. It just needs to be there!
| racprops wrote: | | veektohr wrote: | | Dang, I blinked and you're almost done with the scary stuff! Catching up with this thread kind of renews my thirst for a real-parts build. Getting a vintage 3" bulldog has proved a challenge here in CA, though, since only the newer 2.5" version is on the approved handguns roster... |
That is a NO Problem as you need a 4.5 custom made barrel anyway...
Rich |
|
|
| Back to top |
|
|
|
|
|
|
|
|
|
|
|
| Author |
Message |
joberg
Community Member
Joined: 06 Oct 2008
Posts: 9463
|
| Posted: Sun Aug 07, 2016 7:38 am Post subject: |
|
|
Great progress eltee! More challenges ahead, but the I'm sure you can see that little light at the end of the tunnel  |
|
| Back to top |
|
|
|
|
|
|
|
|
|
|
|
| Author |
Message |
eltee
Community Member
Joined: 31 Oct 2006
Posts: 437
Location: West Coast USA
|
| Posted: Fri Aug 19, 2016 3:24 pm Post subject: |
|
|
In the home stretch!
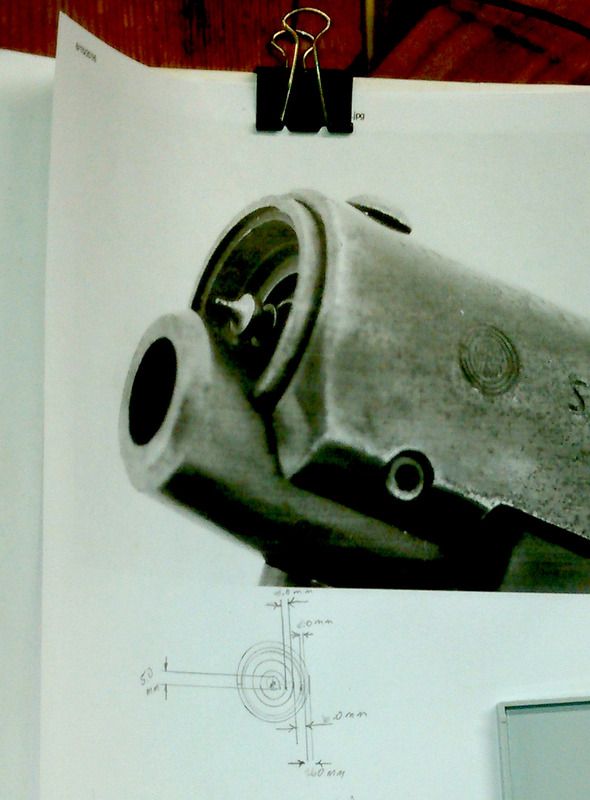
Working on the "pin" that protrudes out of the front of the Steyr upper. It's tiny but with a lot of fine detailing which I want to replicate on my build. Also, the little "cap" on the front of the Steyr has a lot of detailing and stepping which we are also trying to match. This "pin" is incorporated into the bolt assembly and we're going to try to make an entire bolt assembly out of metal including this pin.
The cap is going to be made of steel so it will cut cleanly and precisely and I can blue it to match the Steyr receiver.
Last edited by eltee on Fri Aug 19, 2016 3:31 pm; edited 1 time in total |
|
| Back to top |
|
|
|
|
|
|
|
|
|
|
|
| Author |
Message |
eltee
Community Member
Joined: 31 Oct 2006
Posts: 437
Location: West Coast USA
|
| Posted: Fri Aug 19, 2016 3:29 pm Post subject: |
|
|
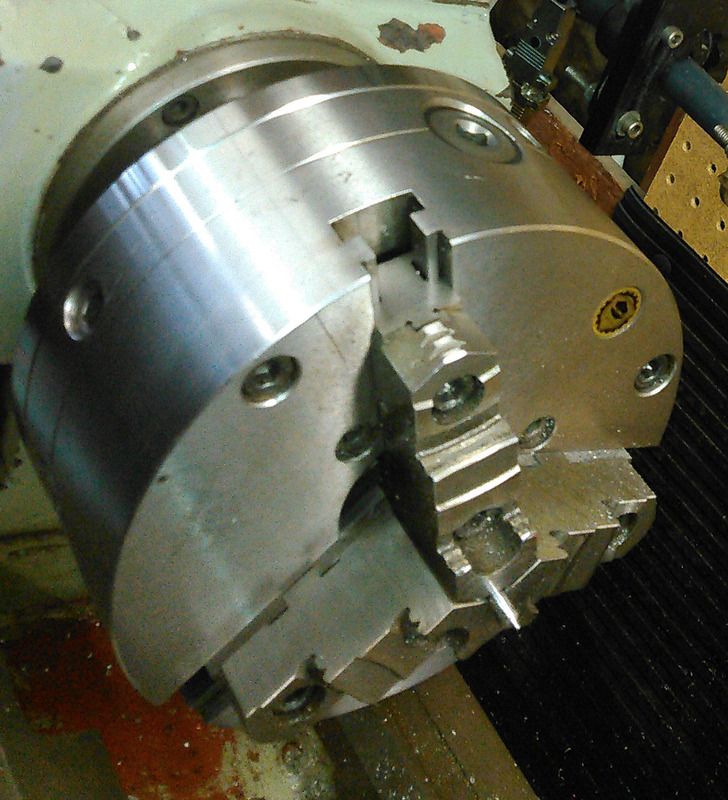
The lathe is a precision, industrial job but the inventory of cutters on hand were for larger pieces. Smaller cutters were purchased to get inside that small slug of steel.
Here's a pic showing the big cutter and the small piece of steel that will be turned into the end cap at the front of the Steyr.
 |
|
| Back to top |
|
|
|
|
|
|
|
|
|
|
|
| Author |
Message |
joberg
Community Member
Joined: 06 Oct 2008
Posts: 9463
|
| Posted: Mon Aug 22, 2016 10:02 am Post subject: |
|
|
Beauty!...and I was talking about the lathe  Kidding aside eltee, this shooter will be an incredible piece when finished! Kidding aside eltee, this shooter will be an incredible piece when finished! |
|
| Back to top |
|
|
|
|
|
|
|
|
|
|
|
| Author |
Message |
eltee
Community Member
Joined: 31 Oct 2006
Posts: 437
Location: West Coast USA
|
| Posted: Sat Oct 15, 2016 7:31 pm Post subject: |
|
|
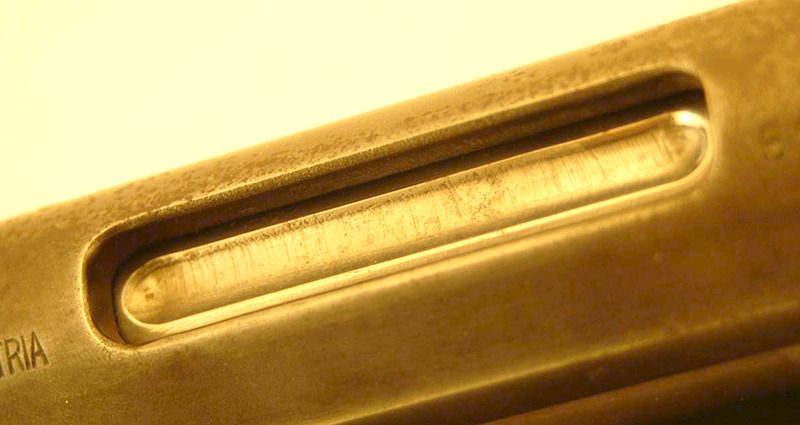
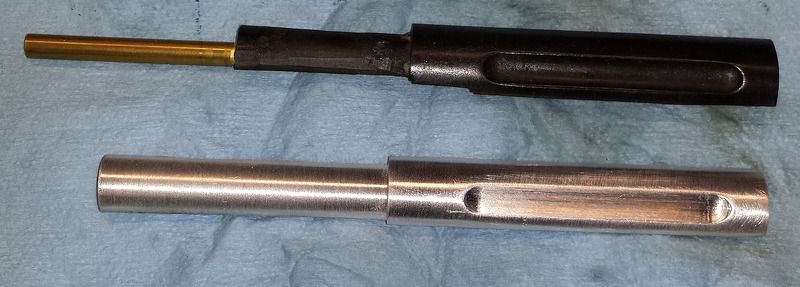
Working on the bolt assembly. The front end "pin" is done, machined out of aluminum. The middle section which is seen through the open ejection port of the Steyr receiver is the current project. Initially I thought it was smooth and brightly polished like the original Steyr bolt. This photo of the original prop reflects otherwise.
Here is the first bolt center section machined out of aluminum. It needs trimming, finishing, etc. but the groove detail looks pretty decent IMHO. It's shown next to the sample provided by Rich Coyle made from black resin.
The originals show brass rods welded to the center piece. I had some low temp welding rods for use specifically with aluminum so my welder will attempt to weld the correct diameter brass rods to the aluminum center piece without distortion to either material. |
|
| Back to top |
|
|
|
|
|
|
|
|
|
|
|
| Author |
Message |
eltee
Community Member
Joined: 31 Oct 2006
Posts: 437
Location: West Coast USA
|
| Posted: Sat Oct 15, 2016 7:33 pm Post subject: |
|
|
Here is what the "pin" looks like. Sorry about the poor pic, I had to use my cell phone for this photo.
 |
|
| Back to top |
|
|
|
|
|
|
|
|
|
|
|
| Author |
Message |
joberg
Community Member
Joined: 06 Oct 2008
Posts: 9463
|
| Posted: Sun Oct 16, 2016 7:50 pm Post subject: |
|
|
| Home stretch eltee, home stretch. Eager to see it all come together and...fire! |
|
| Back to top |
|
|
|
|
|
|
|
|
|
|
|
|
You cannot post new topics in this forum
You cannot reply to topics in this forum
You cannot edit your posts in this forum
You cannot delete your posts in this forum
You cannot vote in polls in this forum
|
|
|
|
|
|
|
|