|
 |
|
 |
|
| Author |
Message |
DARKVIEW
Community Member

Joined: 06 Aug 2015
Posts: 51
Location: UK
|
 Posted: Tue Sep 08, 2015 3:43 am Post subject: Posted: Tue Sep 08, 2015 3:43 am Post subject: |
 |
|
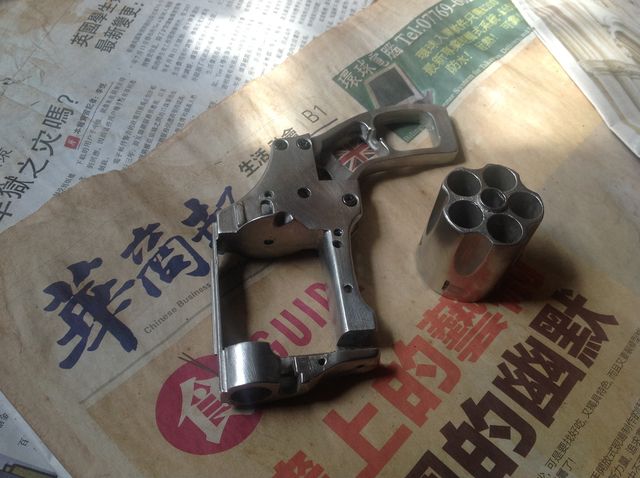
Well lm fairly happy with it up to now...it's quite sturdy & I've had little to no probs with the pewter & bluing up to now.. The metal has been quite forgiving. Wouldn't want to toss the gun about but who would!!!
I'm waiting till its fully complete before more accurate weathering to the 'Hero Prop'.
_________________
https://www.facebook.com/darkview
http://twitter.com/darkview |
|
| Back to top |
|
|
|
|
 |
|
 |
|
|
|
|
| Author |
Message |
racprops
Community Member

Joined: 30 Oct 2006
Posts: 2450
Location: Phoenix AZ
|
| Posted: Tue Sep 08, 2015 3:55 am Post subject: |
|
|
They are OK...I really wish I could get them done in China as the pro was.
BUT I have found that the pro IS a touch off size, and I can only say my parts are off the real thing and that I have not offered my metal Bulldog parts as replacement as I see they may not fit and are not good replacement to their plastic parts.
I was saying to get a really great fitting Bulldog with real working action use a real Bulldog.
Of course only where doing so is legal.
Rich
_________________
I never have enough time to do all I want to do! |
|
| Back to top |
|
|
|
|
|
|
|
|
|
|
|
| Author |
Message |
DARKVIEW
Community Member
Joined: 06 Aug 2015
Posts: 51
Location: UK
|
| Posted: Tue Sep 08, 2015 9:37 am Post subject: |
|
|
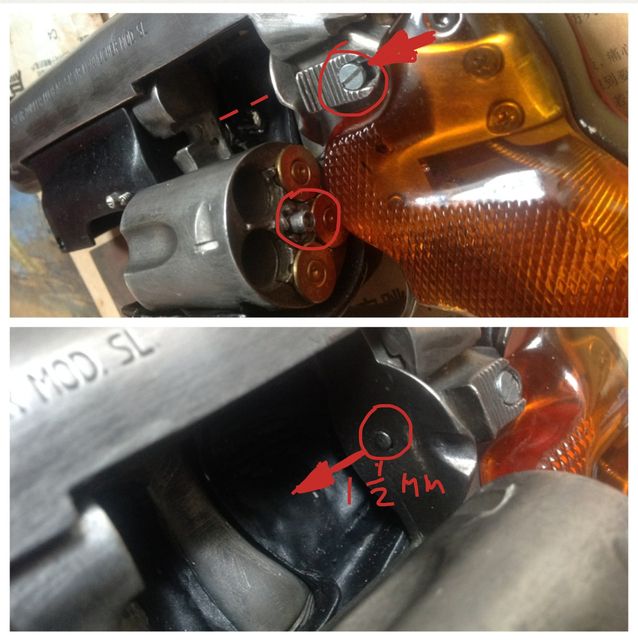
Sorry crude ipad pen sample....Got the cylinder & thumbpiece to work properly.... Moved the thumbpiece in 1.5mm (tighten screw, inner to the thumbpiece bolt) then the central cyclinder barrel clicks out/in enough even with full load bullets....right! What's next... 
_________________
https://www.facebook.com/darkview
http://twitter.com/darkview
Last edited by DARKVIEW on Wed Sep 09, 2015 2:42 am; edited 1 time in total |
|
| Back to top |
|
|
|
|
|
|
|
|
|
|
|
| Author |
Message |
joberg
Community Member
.jpg)
Joined: 06 Oct 2008
Posts: 9447
|
| Posted: Tue Sep 08, 2015 6:27 pm Post subject: |
|
|
Looking very good so far  |
|
| Back to top |
|
|
|
|
|
|
|
|
|
|
|
| Author |
Message |
DARKVIEW
Community Member
Joined: 06 Aug 2015
Posts: 51
Location: UK
|
|
| Back to top |
|
|
|
|
|
|
|
|
|
|
|
| Author |
Message |
DARKVIEW
Community Member
Joined: 06 Aug 2015
Posts: 51
Location: UK
|
| Posted: Mon Sep 14, 2015 8:06 am Post subject: |
|
|
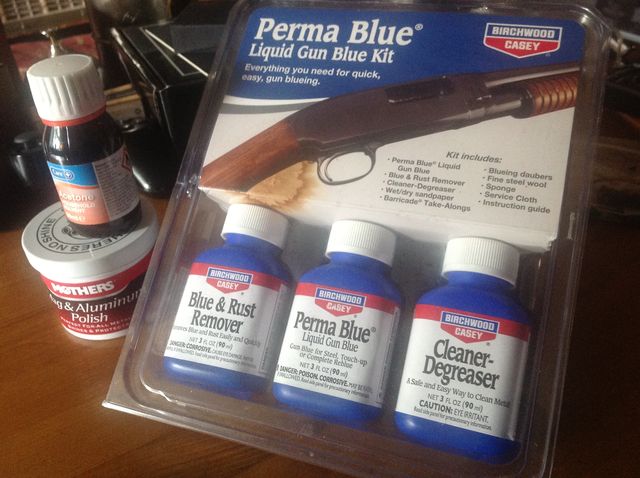
This is the various kits l use for the bluing, polishing & acetone cleaning... all very good and effective too!!! The Birchwood kit has great wet/dry sandpaper daubers,brushes and cloths.... & fine wire wool included.
_________________
https://www.facebook.com/darkview
http://twitter.com/darkview |
|
| Back to top |
|
|
|
|
|
|
|
|
|
|
|
| Author |
Message |
DARKVIEW
Community Member
Joined: 06 Aug 2015
Posts: 51
Location: UK
|
| Posted: Tue Sep 15, 2015 6:17 am Post subject: |
|
|
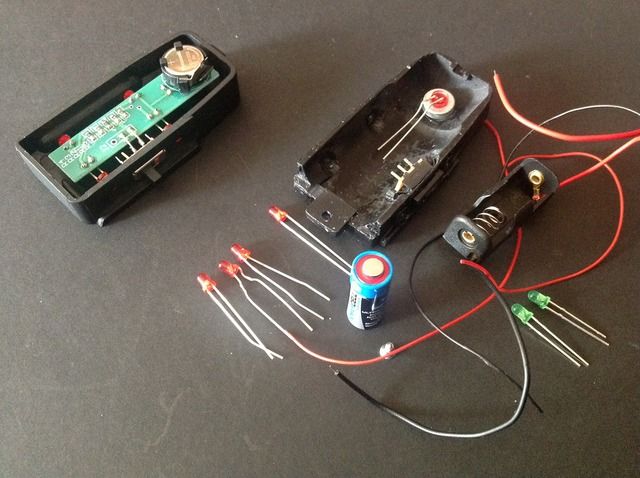
I'm starting the lights, had to scrape away more space for the on/off switch to fit thro, it now just has enough space to switch it on & off!!. And l mean JUST!!
I've added 5-10mm washers to the main center red light space so when the big LED IS placed its correct height on its viewing side when on!

If anyone knows or has a step build of the lights on the SidKit ld love to see it, I've see Richards but its this kits I'm interested in viewing.
_________________
https://www.facebook.com/darkview
http://twitter.com/darkview |
|
| Back to top |
|
|
|
|
|
|
|
|
|
|
|
| Author |
Message |
Bwood
Community Member
Joined: 20 Sep 2009
Posts: 843
|
|
| Back to top |
|
|
|
|
|
|
|
|
|
|
|
| Author |
Message |
DARKVIEW
Community Member
Joined: 06 Aug 2015
Posts: 51
Location: UK
|
|
| Back to top |
|
|
|
|
|
|
|
|
|
|
|
| Author |
Message |
Bwood
Community Member
Joined: 20 Sep 2009
Posts: 843
|
| Posted: Tue Sep 15, 2015 2:18 pm Post subject: |
|
|
Sorry, that's the best I can do. That's a worldcon sidkit wiring. What is missing in these photos that you are looking for? They look pretty clear to me. Did you want a pre-worldcon diagram?  |
|
| Back to top |
|
|
|
|
|
|
|
|
|
|
|
| Author |
Message |
DARKVIEW
Community Member
Joined: 06 Aug 2015
Posts: 51
Location: UK
|
| Posted: Tue Sep 15, 2015 4:21 pm Post subject: |
|
|
Thanks Bwood, Pre- Worldcon would have been good to see... I'll print those samples out to check & perhaps make a easier LED compartment like the Off world blaster if no good.
_________________
https://www.facebook.com/darkview
http://twitter.com/darkview |
|
| Back to top |
|
|
|
|
|
|
|
|
|
|
|
| Author |
Message |
racprops
Community Member
Joined: 30 Oct 2006
Posts: 2450
Location: Phoenix AZ
|
| Posted: Tue Sep 15, 2015 4:53 pm Post subject: |
|
|
Well the picture shows the slide switch on the side and that feature IS Worldcon.
Rich
_________________
I never have enough time to do all I want to do! |
|
| Back to top |
|
|
|
|
|
|
|
|
|
|
|
| Author |
Message |
Bwood
Community Member
Joined: 20 Sep 2009
Posts: 843
|
|
| Back to top |
|
|
|
|
|
|
|
|
|
|
|
| Author |
Message |
DARKVIEW
Community Member
Joined: 06 Aug 2015
Posts: 51
Location: UK
|
|
| Back to top |
|
|
|
|
|
|
|
|
|
|
|
| Author |
Message |
racprops
Community Member
Joined: 30 Oct 2006
Posts: 2450
Location: Phoenix AZ
|
| Posted: Tue Sep 15, 2015 7:01 pm Post subject: |
|
|
No one knew of the switch between the LEDs on the side until Karl and I photograph the real prop at worldcon.
_________________
I never have enough time to do all I want to do! |
|
| Back to top |
|
|
|
|
|
|
|
|
|
|
|
| Author |
Message |
racprops
Community Member
Joined: 30 Oct 2006
Posts: 2450
Location: Phoenix AZ
|
| Posted: Tue Sep 15, 2015 7:08 pm Post subject: |
|
|
The picture posted shows that kind of switch.
_________________
I never have enough time to do all I want to do! |
|
| Back to top |
|
|
|
|
|
|
|
|
|
|
|
| Author |
Message |
DARKVIEW
Community Member
Joined: 06 Aug 2015
Posts: 51
Location: UK
|
| Posted: Tue Sep 15, 2015 7:12 pm Post subject: |
|
|
Yeah l can see..Interesting to know.
Thought l'd show people the LED Casing for a OFFWORLD prebuilt (top left) & my SidKit Worldcon right below...
_________________
https://www.facebook.com/darkview
http://twitter.com/darkview
Last edited by DARKVIEW on Wed Sep 16, 2015 7:20 am; edited 1 time in total |
|
| Back to top |
|
|
|
|
|
|
|
|
|
|
|
| Author |
Message |
DARKVIEW
Community Member
Joined: 06 Aug 2015
Posts: 51
Location: UK
|
|
| Back to top |
|
|
|
|
|
|
|
|
|
|
|
| Author |
Message |
DARKVIEW
Community Member
Joined: 06 Aug 2015
Posts: 51
Location: UK
|
| Posted: Wed Sep 16, 2015 7:17 am Post subject: |
|
|
With this Sidkit I'm going to join these 2 parts!!!?, should l solder or proxy glue!? Feedback & advice from the pros/experienced on all aspects on this thread hopefully is valuable to us makers/buyers of this fabulous blaster so you know what your getting and what's involved. Im saving for next year to go Richards & possibly tomenosuke if the wife don't catch me 
_________________
https://www.facebook.com/darkview
http://twitter.com/darkview |
|
| Back to top |
|
|
|
|
|
|
|
|
|
|
|
| Author |
Message |
racprops
Community Member
Joined: 30 Oct 2006
Posts: 2450
Location: Phoenix AZ
|
| Posted: Wed Sep 16, 2015 7:44 am Post subject: |
|
|
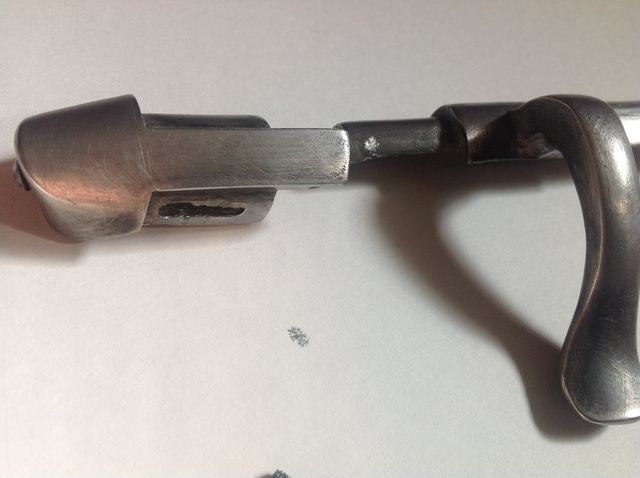
Neither, the bolt turns and the rear cap has to be loose, there should be a hole in the back of the rear cap and you need to drill into the back of the bolt and thread the hole.
The bolt turns on the pin in front and the screw though the rear cap.
And again you picture shows a Worldcon model.
The slot in the side of the rear cap is the travel stop, a small short screw goes though the side of the receiver and though that slot and stops the bolt and rear cap from going far.
Like this:

_________________
I never have enough time to do all I want to do! |
|
| Back to top |
|
|
|
|
|
|
|
|
|
|
|
|
You cannot post new topics in this forum
You cannot reply to topics in this forum
You cannot edit your posts in this forum
You cannot delete your posts in this forum
You cannot vote in polls in this forum
|
|
|
|
|
|
|
|