|
 |
|
 |
|
| Author |
Message |
joberg
Community Member
.jpg)
Joined: 06 Oct 2008
Posts: 9447
|
 Posted: Tue Apr 28, 2015 6:56 pm Post subject: Posted: Tue Apr 28, 2015 6:56 pm Post subject: |
 |
|
Oh yes, one heck of an update mate! Love it already  |
|
| Back to top |
|
|
|
|
 |
|
 |
|
|
|
|
| Author |
Message |
8th_Passenger
Community Member

Joined: 28 Nov 2009
Posts: 443
Location: Hertfordshire, UK
|
| Posted: Thu Apr 30, 2015 2:40 pm Post subject: |
|
|
Thanks joberg.
I've managed to do a bit on the flamethrower this week.
I had a go at the detail just behind the top vent. As with some of the other details on the body I'm aiming for the feel rather than a true copy of the parts.
Here is a reference photo of the detail in question. I'ts enlarged from a pictures I took at the Propstore exhibiton last year.

This is what I have come up with so far pieced together from ABS, Styrene and kit bits. Not very pretty!

And here with a coat of primer.

Placed in position. I think with a few coats of thick paint and some weathering it might do.

Moving back to the white tank, I milled a shoulder on the end of the hex steel bar. this is to reduce the visual weight protruding from the bottom of the tank.


Colin
_________________
Ripley: What's it key on?
Ash: Micro changes in air density. |
|
| Back to top |
|
|
|
|
|
|
|
|
|
|
|
| Author |
Message |
joberg
Community Member
Joined: 06 Oct 2008
Posts: 9447
|
| Posted: Thu Apr 30, 2015 6:17 pm Post subject: |
|
|
Difficult to make-out the greeblies on that particular piece Colin  , but I think that you're close from the original. , but I think that you're close from the original.
Keep up the great work! |
|
| Back to top |
|
|
|
|
|
|
|
|
|
|
|
| Author |
Message |
8th_Passenger
Community Member
Joined: 28 Nov 2009
Posts: 443
Location: Hertfordshire, UK
|
| Posted: Mon May 25, 2015 1:02 pm Post subject: |
|
|
I've managed to do a bit more on the flamethrower this past week.
I turned the detail in the ABS Pastruct pipe which sits under the Hornby piers on the right side.

Here it is laid out against the drawing and reference photo.
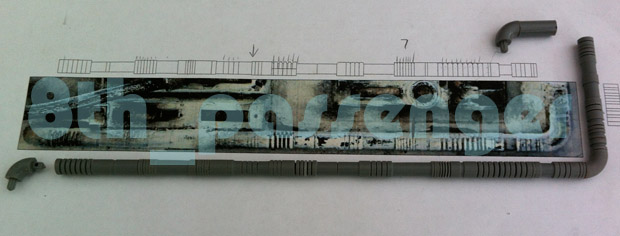
Here assembled with the 90 degree bends.

Here in position.

I also turned the rest of the sections of the Antenna that goes on the left side.

Here are the individual sections.

I plan on adding some extra details onto some of the sections. I want to mould all these sections so I can run some metal through them to strengthen then up.
More soon!!
Colin
_________________
Ripley: What's it key on?
Ash: Micro changes in air density. |
|
| Back to top |
|
|
|
|
|
|
|
|
|
|
|
| Author |
Message |
joberg
Community Member
Joined: 06 Oct 2008
Posts: 9447
|
| Posted: Mon May 25, 2015 8:04 pm Post subject: |
|
|
Very good research and resulting work Colin Yeah, that antenna would bend real fast without some kind of metal rod inside. Good call  |
|
| Back to top |
|
|
|
|
|
|
|
|
|
|
|
| Author |
Message |
SKIN JOB 66
Community Member

Joined: 16 Jan 2008
Posts: 2724
Location: FRANCE
|
| Posted: Tue May 26, 2015 2:15 am Post subject: |
|
|
Great work Colin !!!
Love these pipes a lot, they look perfect !!!
Fred
_________________
THE FUTURE IS A THING OF THE PAST |
|
| Back to top |
|
|
|
|
|
|
|
|
|
|
|
| Author |
Message |
8th_Passenger
Community Member
Joined: 28 Nov 2009
Posts: 443
Location: Hertfordshire, UK
|
| Posted: Tue May 26, 2015 3:35 pm Post subject: |
|
|
Thanks joberg and Fred for your comments.
Hopefully there will be more regular updates in the coming weeks. I'm really trying to keep up the momentum this time.
It's so easy to fall asleep at my desk on a lunch time!
Colin
_________________
Ripley: What's it key on?
Ash: Micro changes in air density. |
|
| Back to top |
|
|
|
|
|
|
|
|
|
|
|
| Author |
Message |
joberg
Community Member
Joined: 06 Oct 2008
Posts: 9447
|
| Posted: Tue May 26, 2015 7:37 pm Post subject: |
|
|
Lay-off the carbs mate  |
|
| Back to top |
|
|
|
|
|
|
|
|
|
|
|
| Author |
Message |
8th_Passenger
Community Member
Joined: 28 Nov 2009
Posts: 443
Location: Hertfordshire, UK
|
| Posted: Sun Jun 07, 2015 4:51 pm Post subject: |
|
|
Time for an update.
I bought the Saturn V kit for the engine part for the lower detail on the white tank.

I decided to mould it as the kit was rather expensive!
I moulded some of the antenna parts too (the ones I have finished patterns for) so I could cast them with a hole running through them to mount on the steel support rod.

I dropped some fine brass rod into the thin sections to give them a bit more strength.

I trimmed off the bottom part of the engine.

Here it is glued onto the main detail bit.

I did a bit of filling and priming on the pattern for the white tank.

I added some extra detail to some of the antenna parts. Unfortunately I added them to the wrong end on the larger one. So I have to strip the detail off and do it again!

Because I sunk the bent side pipe into the side panel I had some gaps I wanted to fill.

So I did a filler fit!

Trimming off the excess.

Here are the grips in progress. I've buffed the edges but left the sides sanded.

Here's a shot of the left side with the antenna taking shape and more details added.
.jpg)
Here's the right side with the the pipes finally glued into position.


I'm getting there.
More soon.
Colin
_________________
Ripley: What's it key on?
Ash: Micro changes in air density. |
|
| Back to top |
|
|
|
|
|
|
|
|
|
|
|
| Author |
Message |
Harry Harris
Community Member

Joined: 23 Aug 2006
Posts: 56
Location: United Kingdom
|
| Posted: Mon Jun 08, 2015 3:15 am Post subject: |
|
|
It's a good job I'm at work and wearing steel-toecapped boots or my chin would hurt my foot!
I love this thread!
Harry
_________________
 |
|
| Back to top |
|
|
|
|
|
|
|
|
|
|
|
| Author |
Message |
8th_Passenger
Community Member
Joined: 28 Nov 2009
Posts: 443
Location: Hertfordshire, UK
|
| Posted: Mon Jun 08, 2015 7:20 am Post subject: |
|
|
Thank you Harry.
_________________
Ripley: What's it key on?
Ash: Micro changes in air density. |
|
| Back to top |
|
|
|
|
|
|
|
|
|
|
|
| Author |
Message |
SKIN JOB 66
Community Member
Joined: 16 Jan 2008
Posts: 2724
Location: FRANCE
|
| Posted: Sat Jun 13, 2015 4:07 pm Post subject: |
|
|
Same as Harry, totally blown away by this new update !
Well done, Colin !
Fred
_________________
THE FUTURE IS A THING OF THE PAST |
|
| Back to top |
|
|
|
|
|
|
|
|
|
|
|
| Author |
Message |
joberg
Community Member
Joined: 06 Oct 2008
Posts: 9447
|
| Posted: Sat Jun 13, 2015 8:25 pm Post subject: |
|
|
| What an update indeed! It was worth the wait Keep up the great work as always. |
|
| Back to top |
|
|
|
|
|
|
|
|
|
|
|
| Author |
Message |
8th_Passenger
Community Member
Joined: 28 Nov 2009
Posts: 443
Location: Hertfordshire, UK
|
| Posted: Sun Jun 21, 2015 4:53 pm Post subject: |
|
|
Thanks for the comments guys.
Here's another update.
I wanted to add a bit more detail to the white tank addition. This is my reference below. What I'm trying to recreate is probably a build up of paint on a surface!
.jpg)
So I came up with these curved pieces on the right to add to the sides.

Like so.


I've also drilled the entry hole into the top vent for the smaller pipe on the right side.

One detail I've yet to make is the underside front detail shown here in one of Harry's photo's.

Using the laser cut parts on the left in the picture of laser cut parts above I came up with this.

Here primed and in position.

I moulded the part and cast it in fast cast.

I noticed some new detail recently on the left side. The domed ends on the half cylinder.

So I turned up a pattern, moulded it (casts above) and added it to the existing cast.


Here glued in position with the underside detail.

I finally cast the rest of the antenna parts. I embedded some M3 bolts into the cast so I can bolt it onto the left side.

Here it is dry fit assembled.

I'm undecided whether I should add more detail to the bottom of the unit. There is definitely more stuff there which has fallen off through use.

Just preparing the tank to be moulded in glass fibre. I laser cut a bed at the half way point to cut down on the amount of 'claying up' around the piece. I hope to get onto this soon.

In the next update I should have the antenna fixed in position along with the rest of the details on the body. This means I can glue on the left side and prime the whole body.
I'm also going to have a go at making a copper cover for the top vent rather than the vac form one I have.
Still lots to do but making steady progress.
Colin
_________________
Ripley: What's it key on?
Ash: Micro changes in air density. |
|
| Back to top |
|
|
|
|
|
|
|
|
|
|
|
| Author |
Message |
Pro Mod
Community Member
Joined: 13 Aug 2010
Posts: 108
Location: Manchester, England
|
|
| Back to top |
|
|
|
|
|
|
|
|
|
|
|
| Author |
Message |
8th_Passenger
Community Member
Joined: 28 Nov 2009
Posts: 443
Location: Hertfordshire, UK
|
| Posted: Tue Jun 23, 2015 7:31 am Post subject: |
|
|
Thanks Pro Mod.
Yes that part is definitely a contender.
In fact there is a choice between a couple of the parts.
Quite an interesting kit. Lots of good pieces.
Colin
_________________
Ripley: What's it key on?
Ash: Micro changes in air density. |
|
| Back to top |
|
|
|
|
|
|
|
|
|
|
|
| Author |
Message |
8th_Passenger
Community Member
Joined: 28 Nov 2009
Posts: 443
Location: Hertfordshire, UK
|
| Posted: Tue Jun 23, 2015 2:06 pm Post subject: |
|
|
I got the antenna mounted on the left side today along with a few of the 'smoke bottles' running along the top of the brass square box section.
It looked like there used to be three smoke bottles, so that's what I put on. Also they are the right way round rather than upside down like the ones below (not stuck on yet)!
Here are a few pictures of the progress.


Colin
_________________
Ripley: What's it key on?
Ash: Micro changes in air density. |
|
| Back to top |
|
|
|
|
|
|
|
|
|
|
|
| Author |
Message |
joberg
Community Member
Joined: 06 Oct 2008
Posts: 9447
|
| Posted: Tue Jun 23, 2015 4:38 pm Post subject: |
|
|
This kind of prop is very deceiving. At first glance, you'd think it's simple, but the more you look at it, the more complicated it becomes.
(A little like the V.K. machine).
It's nearing its final shape...eager to see it finished |
|
| Back to top |
|
|
|
|
|
|
|
|
|
|
|
| Author |
Message |
SKIN JOB 66
Community Member
Joined: 16 Jan 2008
Posts: 2724
Location: FRANCE
|
| Posted: Fri Jun 26, 2015 1:50 am Post subject: |
|
|
Bravo Colin, another great update, can't believe what you went through to re-create this...
One thing is certain, it's going to be AWESOME once completed !!!
Fred
_________________
THE FUTURE IS A THING OF THE PAST |
|
| Back to top |
|
|
|
|
|
|
|
|
|
|
|
| Author |
Message |
8th_Passenger
Community Member
Joined: 28 Nov 2009
Posts: 443
Location: Hertfordshire, UK
|
| Posted: Sat Aug 01, 2015 4:24 pm Post subject: |
|
|
joberg and Fred, this is a little late but thanks for your comments.
I've had quite a bit on recently so the flamethrower has had to take a bit of a back seat.
Things have calmed down a little and I've been able to return to it.
I'm getting close now to fixing everything together more permanently.
I wanted to change the top vent cover. My original go at it (below) was a vacform over a wooden former. It looked okay but I had a lot of webbing around the base that made it weak.

So I decided to have another go at it. I really wanted it to be covered in metal. I tried folding metal over the former but I didn't really have the right tools. Also it wasn't giving the right look.
So I came up with this approach using copper and aluminium sheet. I cut some spacers and double sided taped them onto the sides of the former.
.jpg)
I then heated the metal and bent it over the former. I then trimmed the metal back to the spacers.

I then removed the spacers to create a recess. Using different thickness' of aluminum I created a void to slip the brass square mesh into.

The wider piece when glued on traps the mesh in place.

The copper sheet bent over the top creates a step on the edge.

I just need to glue the copper down now!

Even though I like the pad eye's I bought to hang the strap off they are not as screen accurate as they could be. So I might try fabricating some.
Colin
_________________
Ripley: What's it key on?
Ash: Micro changes in air density. |
|
| Back to top |
|
|
|
|
|
|
|
|
|
|
|
|
You cannot post new topics in this forum
You cannot reply to topics in this forum
You cannot edit your posts in this forum
You cannot delete your posts in this forum
You cannot vote in polls in this forum
|
|
|
|
|
|
|
|