|
 |
|
 |
|
| Author |
Message |
marsattack
Community Member
Joined: 08 Feb 2009
Posts: 63
Location: Melbourne , Australia
|
 Posted: Fri Mar 26, 2010 1:27 am Post subject: MY BLASTER BUILD , PROGRESS Posted: Fri Mar 26, 2010 1:27 am Post subject: MY BLASTER BUILD , PROGRESS |
 |
|
Hi everyone, I have received my new Coyle blaster after much anticipation.
I got the parcel about 5 days ago and made a start on it yesterday.
I did however spend a bit of time looking through all the instructions that are available on the photobucket and already had a few questions.
I am not new to prop building but very new to Blade runner blasters.
I only ever RE-built a Sidkit which was already a nice build.
This Coyle however is a bit more challenging, as my idea of a raw cast was a little different from a "raw " cast.
not to worry , it will be fun.
I managed to grab 4 pieces of the kit which will be Blued and started sanding, after rendering my right arm useless for a few days and some dollars on correct sandpaper to do the job, i have a few pics and questions regarding this step, which I would like to ask here for help..
I have spoken to a friend that has a machine shop and followed his instructions on polishing raw alloy, short from having it professionally polished this is the outcome..
To have this done by a shop I was afraid that they would remove a lot of the material just to be polished and compromise the shape or size of the part, although by hand they have polished up NEAR mirror finish BUT the picketting on the material is still very visible.
I would have to further remove and could alter the shape of the part.
My question for you GUrus is: How is anyone/everyone coping with this step?
What am i doing wrong, and NO keep on sanding WILL NOT do the job without sacrificing its shape? Further more I hate sanding to begin with!! lol
Any help or imput will much be appreciated, and who knows, for us novices this thread could be a place to share and overcome hurdles in this build.
Thank you all for your time
Mars
[/img]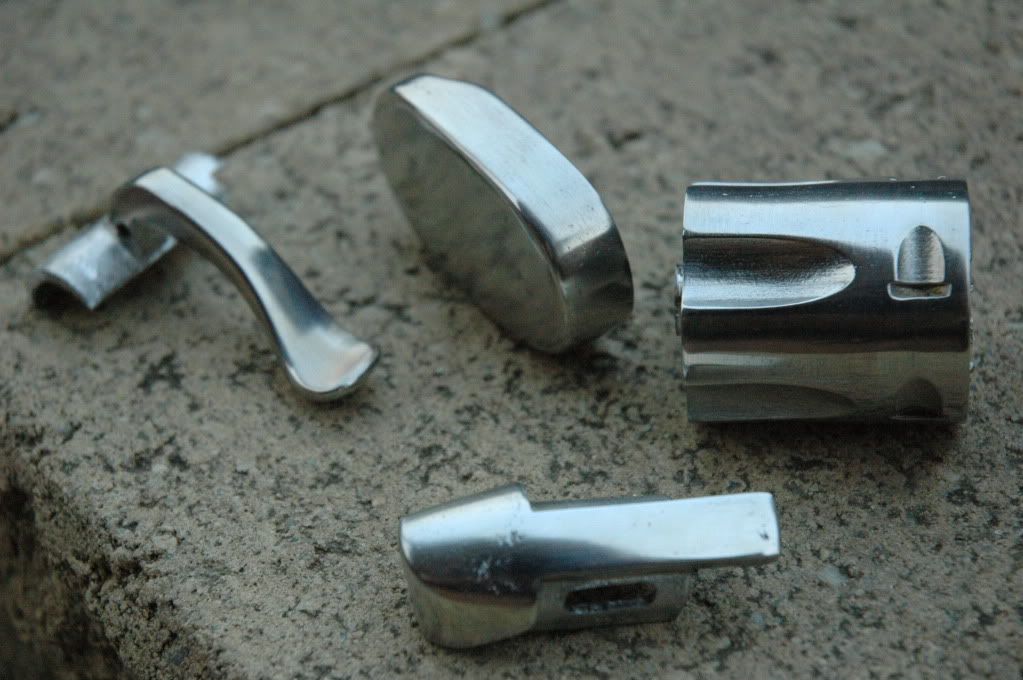
[img]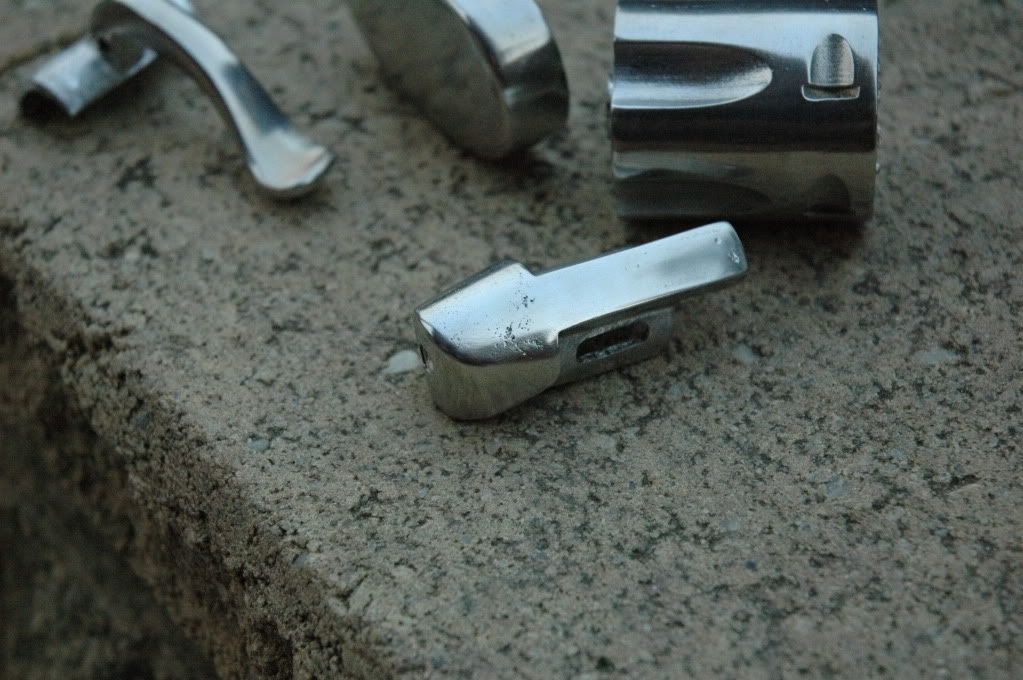
[/img]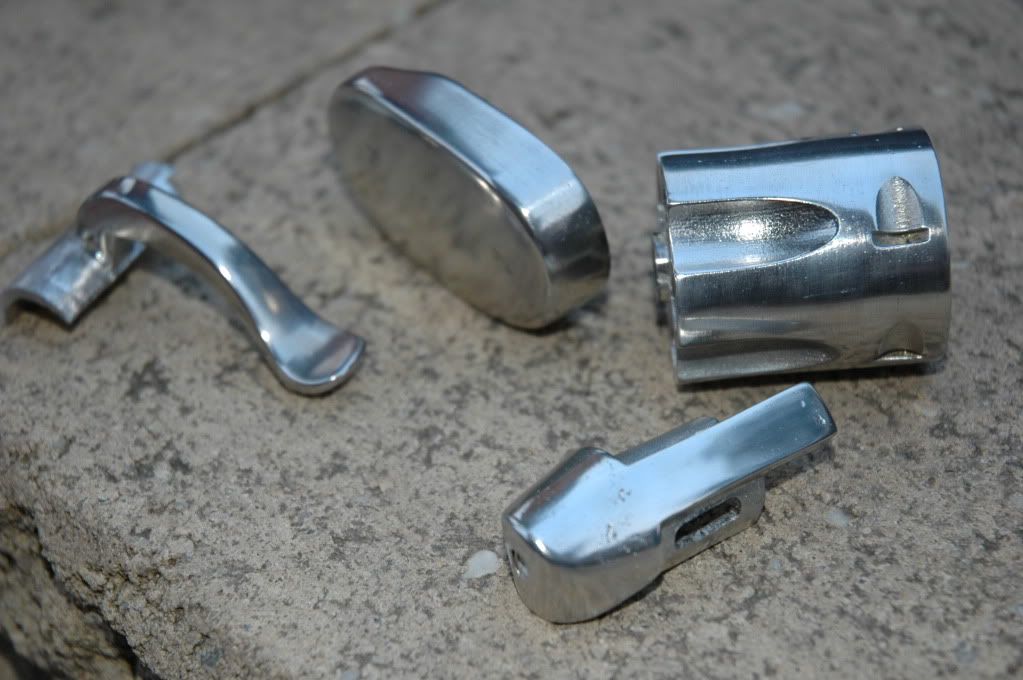
Last edited by marsattack on Sat Jun 05, 2010 2:44 am; edited 2 times in total |
|
| Back to top |
|
|
|
|
 |
|
 |
|
|
|
|
| Author |
Message |
propsjonnyb
Community Member
Joined: 16 Jul 2009
Posts: 476
Location: Helmdon, Northamptonshire UK
|
| Posted: Fri Mar 26, 2010 4:43 am Post subject: |
|
|
| You face a common problem that faces all who cast in metal , 'pitting' rather like bubbles in resin castings ,however unlike resin which you can fill and sand , you can't really do that with metal ,well I say that but it depends on the depth of the pitting and how skilled you are . I can see by the photos that you've done a good job so far , my only words of advice are to keep on sanding with fine grade grit 180 to say 220 and then go onto polishing . I would use a Dremmel tool with variable speed control and a set of polishing mops and compounds Brown to start , then Yellow and finally Blue . That should get most of it out and if it doesn't, turn it into a feature by weathering it and making it a rust spot ! I mentioned earlier another option , that's to use a soldering iron and a bit of spare pewter ( flashings ) using the iron , melt the pewter and use it like solder, over the pitting, you have to be quick and very careful as obviously the iron will melt the pewter surface if left in contact for any length of time. The idea being to fill the pitting with a thin layer of melted pewter. Then proceed as before sanding with with fine grade grit and then polishing with the various mops and compounds until you get your mirror surface . Then onto blueing and or weathering as you choose . |
|
| Back to top |
|
|
|
|
|
|
|
|
|
|
|
| Author |
Message |
joberg
Community Member
.jpg)
Joined: 06 Oct 2008
Posts: 9471
|
| Posted: Fri Mar 26, 2010 7:02 am Post subject: |
|
|
| So far you`ve done a good job at polishing those parts; as Propjohnny said, repairing pitted pewter is always very tricky because of the low melting point of that particular alloy. You could always try on a hidden part of the gun, or spare part...good luck. |
|
| Back to top |
|
|
|
|
|
|
|
|
|
|
|
| Author |
Message |
andy
Community Guide

Joined: 01 Nov 2006
Posts: 6237
Location: Rochester, NY
|
| Posted: Fri Mar 26, 2010 10:48 am Post subject: |
|
|
Make sure you also use a sanding block to help keep and get those crisp lines and flat surface, or otherwise you will be sanding/polishing into the pits only making them wider. Save the polishing for last or you will end up with a wavy surface. Remember also that some parts of his gun looked a bit beat up (as he did). If you are planning on going for a weathered look these imperfections will add to the effect.
Melting the pewter into the spots would be tricky, if it is even pewter because it sounds like Rich used some zinc and nickel alloy parts. There need to be a pretty deep pit for the metal to actual stick inside of it or otherwise it will just sand right out. Both metal surfaces would need to be melted in able to get them to meld together, which to me sounds like a ticket to disaster if you have not done this a crapload of times before to practice it.
I think there are some metal filled bondo type epoxies that might work for just filling in the pits. There would still be discoloration though. If the pits are small and deep you could actually fill them by rubbing a soft piece of metal over them. It won't fill them perfectly, but it would make the pits less pronounced and should still take bluing.
Andy |
|
| Back to top |
|
|
|
|
|
|
|
|
|
|
|
| Author |
Message |
Staar
Community Member

Joined: 04 Feb 2008
Posts: 757
Location: AUSTRALIA
|
| Posted: Fri Mar 26, 2010 11:19 am Post subject: Re: MY BLASTER BUILD , NEED ADVICE |
|
|
| marsattack wrote: |

|
Hmm...
I have to be honest, that while I appreciate that this run was done as a (cheaper) PropSummit exclusive, I for one would be extremely unhappy if, after so much work, there was still so much damage in evidence on the surface ...
I feel that irrespective of how cheap this was, it still wasn't free!
One can argue that its faithful to the battered WorldCon, but I would want to be the one to decide on what finish I wanted to have - not have it determined before I started the build.
Good luck mate. Even with someone of your skill it looks like you're going to need it...
Regards
MARK
_________________

Last edited by Staar on Fri Mar 26, 2010 11:44 am; edited 1 time in total |
|
| Back to top |
|
|
|
|
|
|
|
|
|
|
|
| Author |
Message |
andy
Community Guide
Joined: 01 Nov 2006
Posts: 6237
Location: Rochester, NY
|
| Posted: Fri Mar 26, 2010 11:43 am Post subject: |
|
|
I have to say I agree with Staar. I would definitly ask Rich to replace any of the pieces you are unhappy with, which IIRC he had offered to do. Pitting in a resin model is more acceptable than in a metal one that is supposed to be unpainted.
Andy |
|
| Back to top |
|
|
|
|
|
|
|
|
|
|
|
| Author |
Message |
marsattack
Community Member
Joined: 08 Feb 2009
Posts: 63
Location: Melbourne , Australia
|
| Posted: Fri Mar 26, 2010 5:51 pm Post subject: |
|
|
Well I have some fantastic advise here.
Propjohnny's theory is something I would love to try by welding some excess flushing , although I may be a little scared as this material ,i have no experience nor idea of how it works.
Joberg and Andy, i think after reading your post , this may be very well out of my league.
There is also the important part of removing the "flashing", on some of these parts the flashing is made up of solid pewter so i am unable to identify where to stop grinding. Test fitting these parts will be a meticulous and difficult job.
So i guess it may have to be left as a rusted worldcon , the pits are too deep and the material too thin , especially that top receiver slider.
Rich has offered to replace some parts , the receiver on mine was a little warped and had a dent. I have not mentioned the pitted parts though. The black painted parts I can sort of deal with as they could be filled and painted , and yes Mark I believe that if someone thought this was a Revell kit assembly with "some" work required , they are totally wrong.lol
Is anyone up to this stage yet???
...and thank you all for imput and recommendations |
|
| Back to top |
|
|
|
|
|
|
|
|
|
|
|
| Author |
Message |
propsjonnyb
Community Member
Joined: 16 Jul 2009
Posts: 476
Location: Helmdon, Northamptonshire UK
|
| Posted: Fri Mar 26, 2010 6:07 pm Post subject: |
|
|
| It is unfortunate that this level of pitting has occured , I have had the first shipment of UK parts from Rich and can say only one or two show any signs of pitting and it's no where near this level , so I think it representative of the quality of the castings, we all knew it was going to be a raw ' fresh out of the mold ' casting , so some clean up work is required . However , I am sure Rich would gladly exchange them , if you contact him and show him the photos . Even the best casting can show pitting , I know from my own experience of hot metal casting it can happen and more often than not . It is one of those unfortunate things that can happen . More often than not it can be ground and polished out and most often disguised in the painting and weathering one can do , I've just finished a Sidkit 2006 model build and there was some pitting on the upper receiver and bolt head , no amount of polishing was going to take it out, so I turned it into rust spots and general 'wear and tear', which once all other avenues have been explored, is all that is left . |
|
| Back to top |
|
|
|
|
|
|
|
|
|
|
|
| Author |
Message |
marsattack
Community Member
Joined: 08 Feb 2009
Posts: 63
Location: Melbourne , Australia
|
| Posted: Fri Mar 26, 2010 6:15 pm Post subject: |
|
|
Johhny , if you have the time and are able to do so, could you take a pic of the end part of the receiver for me please?
THe part that i have shown that seems thin , thank you mate.
Mars |
|
| Back to top |
|
|
|
|
|
|
|
|
|
|
|
| Author |
Message |
racprops
Community Member

Joined: 30 Oct 2006
Posts: 2450
Location: Phoenix AZ
|
| Posted: Sat Mar 27, 2010 7:47 am Post subject: |
|
|
I am willing for him to send me these poorer parts for exchange.
The parts that will be painted black, I feel can easily be filled with body working stuff like bondo and cream filler.
The parts that will be blued do need a fine finish, and these I will try to get you the best I can.
Some of these flaws do not show up until you do the sanding and polishing.
NO Part will be 100% flaw fee but I can see that the rear cap is a little more that I would like to see.
Another problem I was expecting has shown up, taken as standalone part alone, it is very easy to find the slightest flaw, and to try to make every part perfect.
These flaws will seem to disappear in a complete build up with paint and finishing.
I really worked extra hard to ship the best parts I could.
Rich
_________________
I never have enough time to do all I want to do! |
|
| Back to top |
|
|
|
|
|
|
|
|
|
|
|
| Author |
Message |
marsattack
Community Member
Joined: 08 Feb 2009
Posts: 63
Location: Melbourne , Australia
|
| Posted: Sat Mar 27, 2010 10:56 pm Post subject: |
|
|
Rich, I can see that building such a kit will not suit everyone, I did mention that you were more than kind to replace these parts.
I did however wanted to make somewhat of a thread to see how everyone is building them and tips and ideas from members.
I felt I would have been bothering you to constantly ask , "how do you do this?" and "how do you do that?"
Also if this were how all the parts were for every kit, then what are guys here doing to overcome those issues.
I thank you for replacing these and I will make sure I build a kickass blaster.
And please add your advice as it will not only help me but all involved.
Mars
Last edited by marsattack on Sun Mar 28, 2010 8:09 am; edited 1 time in total |
|
| Back to top |
|
|
|
|
|
|
|
|
|
|
|
| Author |
Message |
racprops
Community Member
Joined: 30 Oct 2006
Posts: 2450
Location: Phoenix AZ
|
| Posted: Sun Mar 28, 2010 6:32 am Post subject: |
|
|
You were/are no bother.
I knew this would be an involved job when I took it on.
And I knew I would fumble the ball in some places with the instructions and would have to fix it, so you asking questions on this site would help me fix them and thus others.
I think the answers by others here have been good ones.
When the parts get here, I can see if power sanding will clean them up, or if I can solder new metal and then sand then down (I do that on some parts/cases) or if a replacement part is needed.
You seem to have done everything you could.
Rich
_________________
I never have enough time to do all I want to do! |
|
| Back to top |
|
|
|
|
|
|
|
|
|
|
|
| Author |
Message |
marsattack
Community Member
Joined: 08 Feb 2009
Posts: 63
Location: Melbourne , Australia
|
| Posted: Sun Mar 28, 2010 8:11 am Post subject: |
|
|
Thank you mate!
much appreciated
Mars |
|
| Back to top |
|
|
|
|
|
|
|
|
|
|
|
| Author |
Message |
Staar
Community Member
Joined: 04 Feb 2008
Posts: 757
Location: AUSTRALIA
|
| Posted: Sun Mar 28, 2010 12:09 pm Post subject: |
|
|
Hopefully the parts can be replaced Rich. I'm not sure how happy I would be with items that have been patched...
Either way your support here is - as always - much appreciated!
Regards
MARK
_________________
|
|
| Back to top |
|
|
|
|
|
|
|
|
|
|
|
| Author |
Message |
racprops
Community Member
Joined: 30 Oct 2006
Posts: 2450
Location: Phoenix AZ
|
| Posted: Sun Mar 28, 2010 12:20 pm Post subject: |
|
|
I do the best I can.
The castings looked great and these kind of flaws can show up after the first sandings.
And what is the differance between melted pewter in a mold and my remelting and add some more pewter by hand.
This metal rewelds to its self, so if done right it is far better than any filler, bondo, super glue used on any plastic, where it is hard to get a great blend, with the metal it is like it was always a part of the oringinal casting.
But if that is going to bother you please do not buy.
Rich
_________________
I never have enough time to do all I want to do! |
|
| Back to top |
|
|
|
|
|
|
|
|
|
|
|
| Author |
Message |
Staar
Community Member
Joined: 04 Feb 2008
Posts: 757
Location: AUSTRALIA
|
| Posted: Sun Mar 28, 2010 12:25 pm Post subject: |
|
|
| racprops wrote: | I do the best I can.
The castings looked great and these kind of flaws can show up after the first sandings.
And what is the differance between melted pewter in a mold and my remelting and add some more pewter by hand.
This metal rewelds to its self, so if done right it is far better than any filler, bondo, super glue used on any plastic, where it is hard to get a great blend, with the metal it is like it was always a part of the oringinal casting.
But if that is going to bother you please do not buy.
Rich |
Relax Rich...
Its not a question of buying or not buying it was a perfectly valid question and your answer is logical and to the point.
regards
MARK
_________________
|
|
| Back to top |
|
|
|
|
|
|
|
|
|
|
|
| Author |
Message |
marsattack
Community Member
Joined: 08 Feb 2009
Posts: 63
Location: Melbourne , Australia
|
| Posted: Mon Mar 29, 2010 12:45 am Post subject: |
|
|
hi and yes I agree , if I am the only one with these type of parts , then yes I would like them replaced or flawlessly repaired.
It is a question regarding the condition of the parts and I believe not of your work Rich.
Since no one has stepped up in showing a pitted part or a finished clean part , i am led to believe that my kit was one with more than normal pitting, that is all.
I would like the parts at least similar to those of your work, hence me wanting a kit of yours.
I have not had much dealings with you Rich but if the "don't buy it" was meant for me , then this does not make me happy 
Mars |
|
| Back to top |
|
|
|
|
|
|
|
|
|
|
|
| Author |
Message |
Barking Dragon

Joined: 04 Jan 2010
Posts: 7
Location: Australia
|
| Posted: Mon Mar 29, 2010 5:45 am Post subject: LE Blaster |
|
|
| Is there no one else out there that has started building their kit from this run? I too would have liked to have seen how the others are going puting together this kit and where they are up to. |
|
| Back to top |
|
|
|
|
|
|
|
|
|
|
|
| Author |
Message |
propsjonnyb
Community Member
Joined: 16 Jul 2009
Posts: 476
Location: Helmdon, Northamptonshire UK
|
| Posted: Mon Mar 29, 2010 6:27 am Post subject: |
|
|
| Since I am in exactly the same boat as all of you , I will post pictures of my builds when I start them , I will also say , that of all the pieces I have had from Rich to date, only a few parts have 'pitting' of all the parts sent to date , I have sorted through them and picked the best for the other customer orders, leaving me with ( and this is no disprespect towards Rich, nor am I trying to defend him ) the 'worst' , this does not mean they are 'bad' just that they have slightly more flashing or a little more pitting than the others , since I have over 30 years of experience in restoring and building props , this doesn't worry me too much, even my own hot metal casting are sometimes 'pitted', it all depends on many variables - the alloy mix, scag, the temperature, the dusting powder used in the molds etc I could go on , we all bought a 'fresh out of the mold' kit from Rich , so to expect the raw casts to be perfect is slightly unreasonable - as Rich has said he will exchange pieces, he has prepped some parts as they require specialist tools , but let's be honest here most of the labour is going to be ours , machine tools , belt sander and polisher will make it easy, if you haven't got them ,well hand tools and a dremmel etc is next - last of all , is your last resort - your own two hands and lots and lots of sanding and polishing ! as the more effort you put in , surprisingly the better the end result will be . |
|
| Back to top |
|
|
|
|
|
|
|
|
|
|
|
| Author |
Message |
racprops
Community Member
Joined: 30 Oct 2006
Posts: 2450
Location: Phoenix AZ
|
| Posted: Mon Mar 29, 2010 8:42 am Post subject: |
|
|
My response of “ if that bothers you then please don’t buy” was armed at: “Hopefully the parts can be replaced Rich. I'm not sure how happy I would be with items that have been patched...”
I find that kind of remark upsetting, it seems to mean: “I expect perfect parts, and even repaired parts will be unacceptable.”
It also seems to say: “ I expect perfect parts out of the box and will not put up with repairing them or for you to repair them, nor with exchanging…” I feel this is a bit unreasonable.
This is impossible to do, at lease with the production I can get done, and anyone expecting every part to be perfect will be unhappy.
I would rather not sell a model to someone with such expectations and save both of us all the fuss.
I also feel that the only parts that I am willing to exchange are the ones that will be treated by pewter black, or bluing, this is the Styer Receiver, rear cap, cocking lever, trigger guard, triggers, and in some cases the Bulldog frame.
All parts that end up painted black can be fix with body filler and paint.
I am even willing to work with people that mess things up, again within reason.
Like propsjonny, I sent the best of the castings to everyone keeping the worst for my own building, as I know how to fix things which is not a part of your deal.
But I expected reasonable expectation, that there may be some small minor flaws that either you can fix or leave alone and build the model.
These are the best castings and models I have ever done, (really) with the very latest details and is as accurate as I can make them. I have built great models with less than these castings.
Two things: If you study each part by its self you can pick it apart.
If you were to give built models this kind of study you will find flaws, but 95% of the time the completed model will look fantastic, in its whole.
Those of you that are getting these are getting the best of the best: Best castings, pick of the litter, the best made from the newest masters, with the latest details.
The deluxe kits are also getting extra work on my side as again these will be taken apart and given the third degree….
This is one of the reasons I have not wanted to do kits… it is very hard to make kit parts that can pass this kind of expectations, and to do the instructions, that took days of photos and work….and the risk that I am handing someone the parts to make copies has always been a factor.
Look closely at the real Worldcon prop, it was badly pitted and rusting, with a broken grip, cracked side cover and with ware and tare.
It does not stand up to these kind of expectations.
I hope that helps clear things up.
Rich
_________________
I never have enough time to do all I want to do! |
|
| Back to top |
|
|
|
|
|
|
|
|
|
|
|
|
You cannot post new topics in this forum
You cannot reply to topics in this forum
You cannot edit your posts in this forum
You cannot delete your posts in this forum
You cannot vote in polls in this forum
|
|
|
|
|
|
|
|