|
 |
|
 |
|
| Author |
Message |
Mark Sheppard
Community Member

Joined: 18 Apr 2009
Posts: 951
Location: In my office playing golf, pouring drinks, making deals.
|
 Posted: Thu Apr 30, 2009 12:27 am Post subject: Nostromo Building thread, tips and tricks.... Posted: Thu Apr 30, 2009 12:27 am Post subject: Nostromo Building thread, tips and tricks.... |
 |
|
Here I will compile an entire Nostromo build from molding to finish. Included here will be pictures of my ship, techniques, and advice. All other Nostromo models of any kit type, toys, micro-machines are not only welcome, but encouraged. Fun is the idea! I will also include pictures of other people building my kits from time to time....
These molds are over 25 years old now, they are Poly-urethane, a few latex, a couple older silicons... Only 12 of these kits were produced in the mid-late 80's before the project got shut down. I happened to come into possession of these, and now I am retiring/restoring one mold at a time to keep this model alive. as I sell these kits, 100% of what I make goes back into silicon, plywood, and labor to restore and improve the model. ...and sometimes a little beer to break the monotony....
Lets get started....
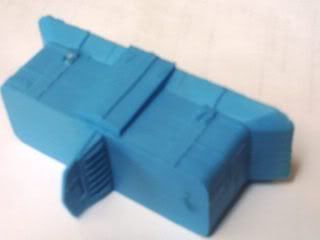


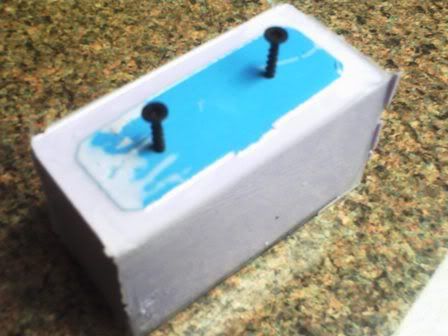
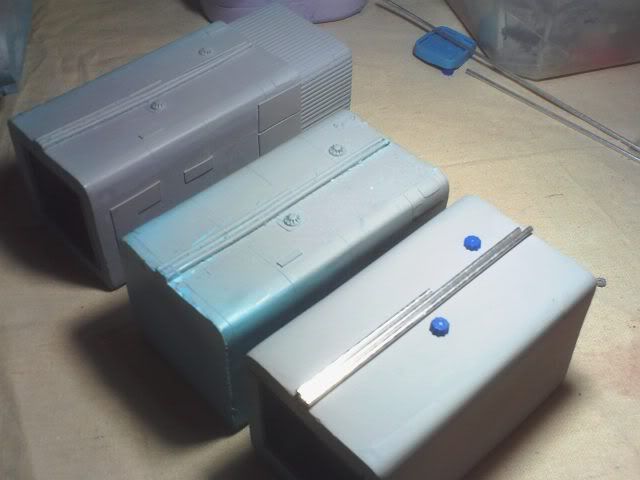
a custom designed thruster module I designed that was missing from the original AEF kit
a pair of hulls
 |
|
| Back to top |
|
|
|
|
 |
|
 |
|
|
|
|
| Author |
Message |
SKIN JOB 66
Community Member

Joined: 16 Jan 2008
Posts: 2724
Location: FRANCE
|
| Posted: Thu Apr 30, 2009 6:00 am Post subject: |
|
|
I just can't stop looking at this model in full amazement !!!

Again, really excited to see this happening, can't wait to see more pics of the work(s) in progress !!!
Fred
_________________
THE FUTURE IS A THING OF THE PAST |
|
| Back to top |
|
|
|
|
|
|
|
|
|
|
|
| Author |
Message |
Gaff87
Community Member

Joined: 05 Oct 2008
Posts: 1727
Location: United Kingdom
|
| Posted: Thu Apr 30, 2009 9:24 am Post subject: |
|
|
I second what Fred said.
I love seeing scale models, just wish i had the skill to attempt one myself.
Great work so far  |
|
| Back to top |
|
|
|
|
|
|
|
|
|
|
|
| Author |
Message |
andy
Community Guide

Joined: 01 Nov 2006
Posts: 6237
Location: Rochester, NY
|
| Posted: Thu Apr 30, 2009 1:45 pm Post subject: |
|
|
Truly awesome! I am still sad I never picked up the Halcyon kit way back when. Now they seem to sell for even more.
I can't wait to see some of these kits come together. Maybe someday I can get in on this club too
Andy |
|
| Back to top |
|
|
|
|
|
|
|
|
|
|
|
| Author |
Message |
Mark Sheppard
Community Member
Joined: 18 Apr 2009
Posts: 951
Location: In my office playing golf, pouring drinks, making deals.
|
| Posted: Thu Apr 30, 2009 11:32 pm Post subject: |
|
|
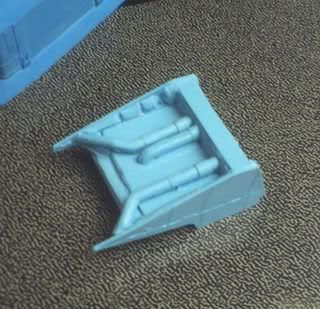
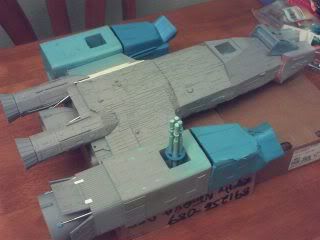
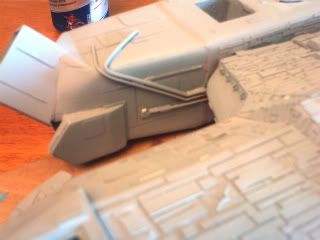
Fitting the prototype Thruster Mod
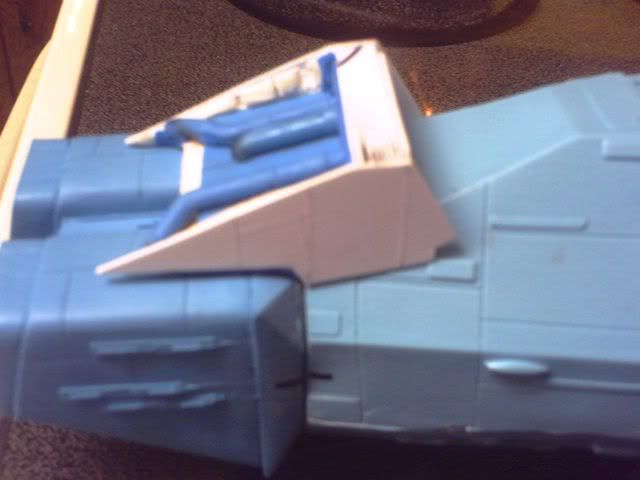
Molding a new Docking module retro's
Creating a new Engine nacelle mold from 25 year old molds...
Fitting the forward module to the Hull, smoothing out the joint with a bit of spot-putty
Test fitting the Docking module, adding more detail then testing with 99 cent primer for effect...
Starting the massive hull detail with 0.7 millimeter vinyl cut into endless small strips to give the ship a sense of size...
 |
|
| Back to top |
|
|
|
|
|
|
|
|
|
|
|
| Author |
Message |
clutch
Community Member

Joined: 12 Dec 2006
Posts: 548
|
| Posted: Fri May 01, 2009 12:44 am Post subject: |
|
|
| That is some wild detailing. You should mold that once you are finished! |
|
| Back to top |
|
|
|
|
|
|
|
|
|
|
|
| Author |
Message |
joberg
Community Member
.jpg)
Joined: 06 Oct 2008
Posts: 9447
|
| Posted: Fri May 01, 2009 7:03 am Post subject: |
|
|
| Very good work JTParker!! Glad to see the progress on that baby. |
|
| Back to top |
|
|
|
|
|
|
|
|
|
|
|
| Author |
Message |
Mark Sheppard
Community Member
Joined: 18 Apr 2009
Posts: 951
Location: In my office playing golf, pouring drinks, making deals.
|
| Posted: Fri May 01, 2009 11:53 pm Post subject: |
|
|
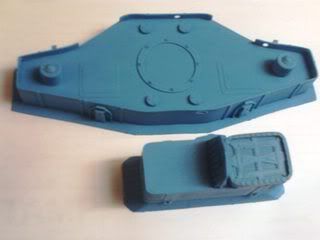
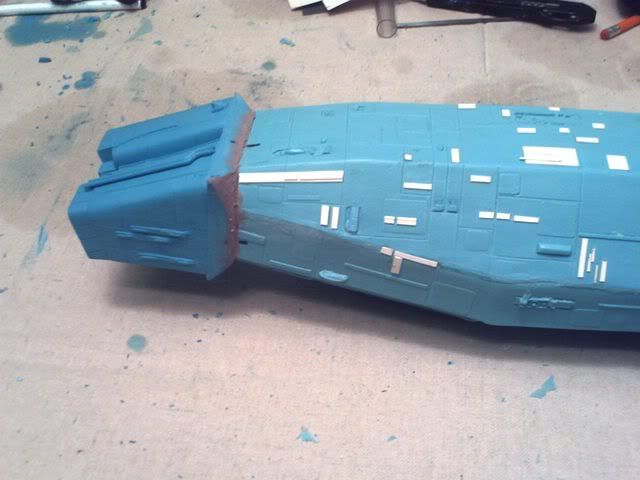
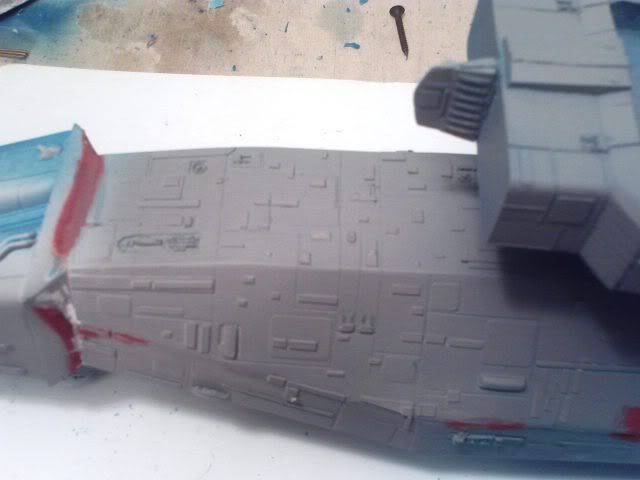
Installing the rear lower engines...
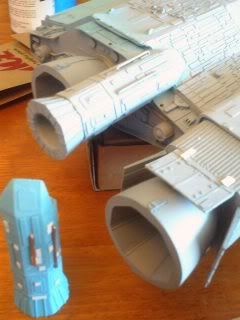
Detailing the fairing....
Top view, reactor plumbing
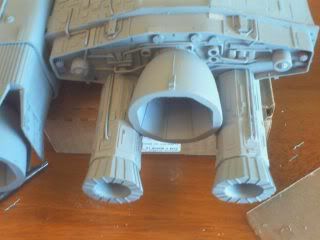
Bottom rear view...
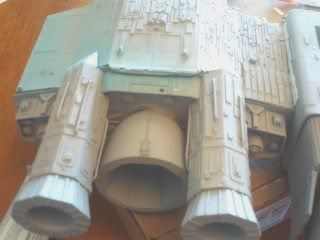
Test fitting the nacelle and landing gear before VTOL angle modification...
 |
|
| Back to top |
|
|
|
|
|
|
|
|
|
|
|
| Author |
Message |
Mark Sheppard
Community Member
Joined: 18 Apr 2009
Posts: 951
Location: In my office playing golf, pouring drinks, making deals.
|
| Posted: Sat May 02, 2009 12:00 am Post subject: |
|
|
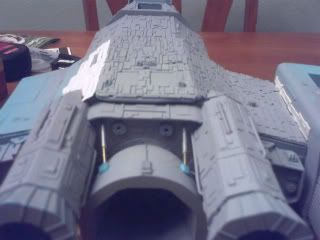
close up
 |
|
| Back to top |
|
|
|
|
|
|
|
|
|
|
|
| Author |
Message |
Gaff87
Community Member
Joined: 05 Oct 2008
Posts: 1727
Location: United Kingdom
|
| Posted: Sat May 02, 2009 9:42 am Post subject: |
|
|
Oh man, this is looking great.
Love the detail. |
|
| Back to top |
|
|
|
|
|
|
|
|
|
|
|
| Author |
Message |
joberg
Community Member
Joined: 06 Oct 2008
Posts: 9447
|
| Posted: Sat May 02, 2009 10:14 am Post subject: |
|
|
| Great build! Keep up the good work. |
|
| Back to top |
|
|
|
|
|
|
|
|
|
|
|
| Author |
Message |
Mark Sheppard
Community Member
Joined: 18 Apr 2009
Posts: 951
Location: In my office playing golf, pouring drinks, making deals.
|
| Posted: Sat May 02, 2009 9:31 pm Post subject: View of inner nacelle |
|
|
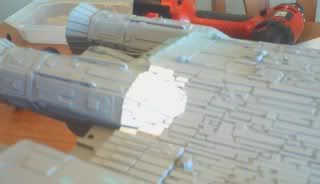
Here is a view of the inner Nacelle, the piping is done by forming soft copper or aluminum tubing included with the kit around the nacelle, simply use needle nose pliers to form the radii, and with your pliers, bending the ends of the piping at a 90 degree angle, cut and securing them into a drilled hole with a drop of super-glue.. I also added a few small drops along the piping to secure the piping. It is a very simple process, and looks pretty cool...
Space Jockey has some very good references on this site to go by...
 |
|
| Back to top |
|
|
|
|
|
|
|
|
|
|
|
| Author |
Message |
Mark Sheppard
Community Member
Joined: 18 Apr 2009
Posts: 951
Location: In my office playing golf, pouring drinks, making deals.
|
| Posted: Sat May 02, 2009 10:02 pm Post subject: The bottom hull Cheat Tutorial |
|
|
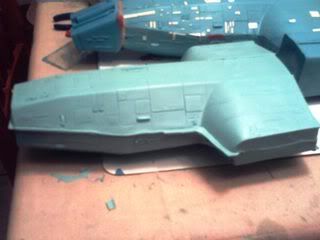
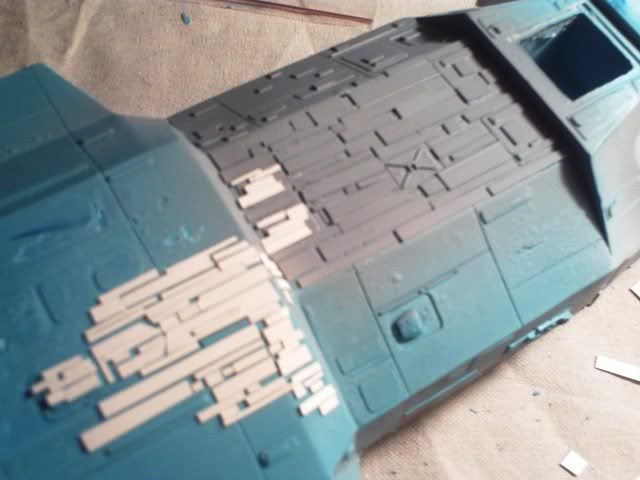
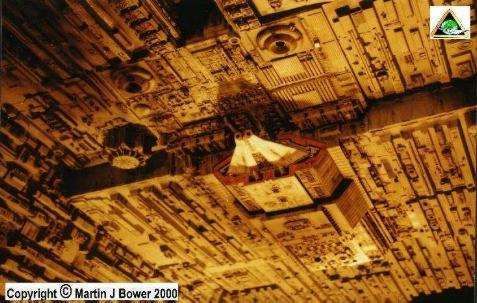
The Nostromo has some intensive detail, and it is a little bit different in each of the three studio models in the movie 'ALIEN". I chose a balance between the largest Studio model and the Shuttle Narcissus escape scene where an incredibly detailed visual effect of the bottom hull zooms off into the distance...This compromise is both practical and easily do-able by even a modeler of intermediate experience like myself 
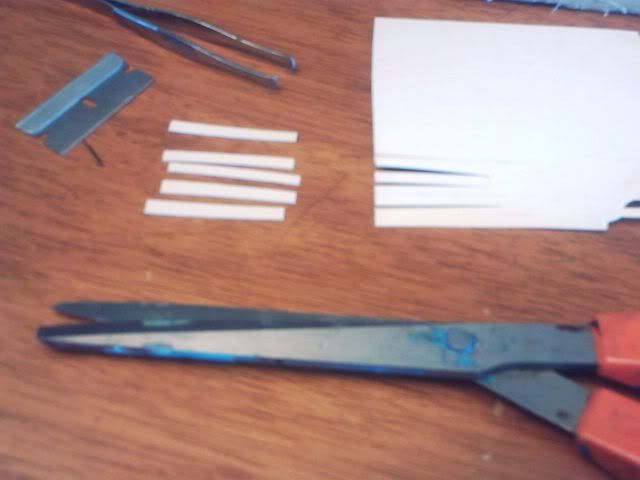
Take the .7 millimeter vinyl included with the kit..and cut it like this.... the recommended size is between 2 millimeter and 10 millimeter strips....in random order... and then cross cut them into various lengths so you end up with a pile of little strips.... get your super glue and tweezers ready..this really is not as bad as it sounds.
 |
|
| Back to top |
|
|
|
|
|
|
|
|
|
|
|
| Author |
Message |
Mark Sheppard
Community Member
Joined: 18 Apr 2009
Posts: 951
Location: In my office playing golf, pouring drinks, making deals.
|
| Posted: Sat May 02, 2009 10:15 pm Post subject: Adding the wing detail |
|
|
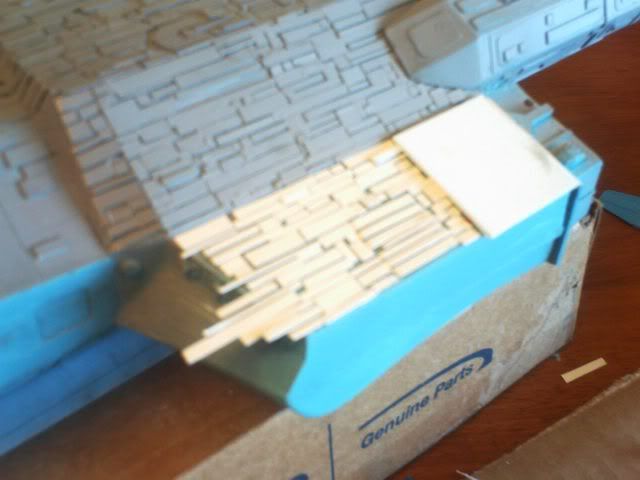
The strips are laid out in random order along the bottom of the "wing" in sections starting from the "deck" to the forward leading edge. Do not be afraid of leaving "over-hang" on the leading edge strips, You can actually use these to keep the little panels straight. Just let them over-hang, and a minute later when they are dry, just slice them off in a smooth line....
do it in sections...a few strips at a time...lay some superglue down, and then the strips with tweezers, keeping them straight with a small pick or paperclip before the glue sets...
 |
|
| Back to top |
|
|
|
|
|
|
|
|
|
|
|
| Author |
Message |
Mark Sheppard
Community Member
Joined: 18 Apr 2009
Posts: 951
Location: In my office playing golf, pouring drinks, making deals.
|
| Posted: Sat May 02, 2009 10:31 pm Post subject: |
|
|
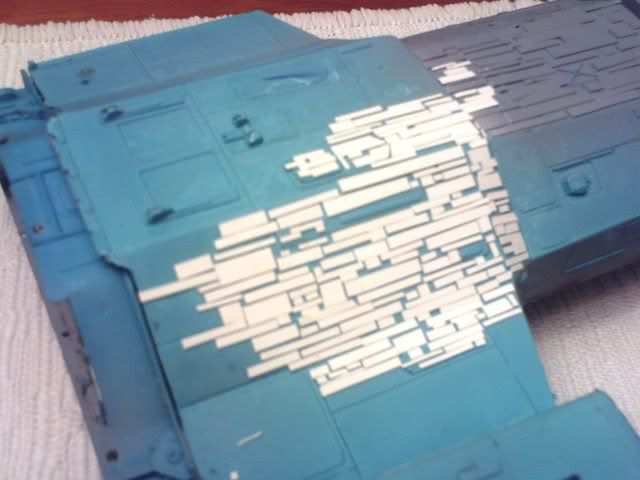
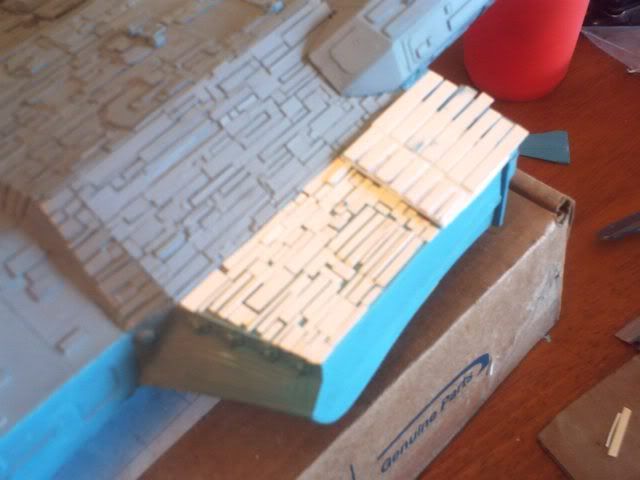
In this next picture, I am adding the little panels to the raised "deck".
Simply use the same width strips, and space them evenly across the "deck" so that there are seven (7) strips across. let them overhang again if you wish...It allows you to keep them straight to the trailing edge. In one minute after the super glue sets, slice them of in a straight line using your razor blade using the trailing edge as a guide...
 |
|
| Back to top |
|
|
|
|
|
|
|
|
|
|
|
| Author |
Message |
Mark Sheppard
Community Member
Joined: 18 Apr 2009
Posts: 951
Location: In my office playing golf, pouring drinks, making deals.
|
| Posted: Sat May 02, 2009 10:37 pm Post subject: |
|
|
On the seven strips, I add a little bit of detail in the form of small squares randomly to give a more dimensional effect. On the right side in this pic I have added the end of a small wire nut for simplicity sake I will call this a "Reactor Venturi"...... I have molded several sizes and they seem to be used throughout various alien props. In this picture you can see the finished "wing" and the "deck" detailing....
For those who always wondered where the shuttle "Narcissus" was situated, here it is.......

Last edited by Mark Sheppard on Sun May 03, 2009 12:36 am; edited 1 time in total |
|
| Back to top |
|
|
|
|
|
|
|
|
|
|
|
| Author |
Message |
Mark Sheppard
Community Member
Joined: 18 Apr 2009
Posts: 951
Location: In my office playing golf, pouring drinks, making deals.
|
| Posted: Sat May 02, 2009 10:40 pm Post subject: |
|
|
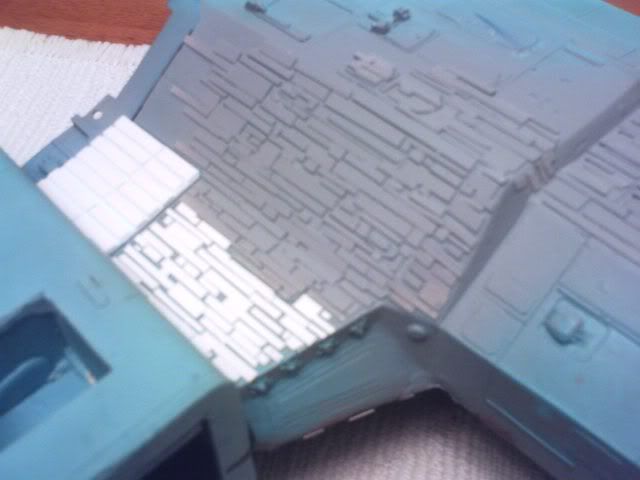
and here is a nice shot of the rear quarter hull.
In this picture you can see both "wings" the decks, and to the left, the basis of the hangar for the Shuttle Narcissus which will be explored in more detail as that gets assembled later on.....
This whole section took me about 45 minutes time from start to finished primer.... very easy, I just play my alien DVD and glue down little "thingies"
a lot of fun....


Last edited by Mark Sheppard on Sun May 03, 2009 12:56 am; edited 7 times in total |
|
| Back to top |
|
|
|
|
|
|
|
|
|
|
|
| Author |
Message |
Space Jockey
Community Member

Joined: 13 Apr 2009
Posts: 559
Location: East Tennessee
|
| Posted: Sun May 03, 2009 12:10 am Post subject: |
|
|
I looks really effective JTP, well done  I was in a model shop today looking at all the different plaststruct shapes one can get. I reckon detailing this thing is half the fun. I was in a model shop today looking at all the different plaststruct shapes one can get. I reckon detailing this thing is half the fun. |
|
| Back to top |
|
|
|
|
|
|
|
|
|
|
|
| Author |
Message |
joberg
Community Member
Joined: 06 Oct 2008
Posts: 9447
|
| Posted: Sun May 03, 2009 8:07 pm Post subject: |
|
|
| Good stuff JTP! Details and more details, that's the way to go. |
|
| Back to top |
|
|
|
|
|
|
|
|
|
|
|
| Author |
Message |
Mark Sheppard
Community Member
Joined: 18 Apr 2009
Posts: 951
Location: In my office playing golf, pouring drinks, making deals.
|
| Posted: Sun May 03, 2009 9:15 pm Post subject: MIkes Nosttromo |
|
|
Thanks for the kind words guys!
check this out.....
Here is a Nostromo Mike is building from one of my kits. He is actually using almost all Metal landing struts and is doing quite a good Job.. Check out the Thrust dampeners he is doing on his engines! He sent me these pics today, and he is almost ready to assemble the nacelles to the hull, It is going to look really nice! another member here 'theprofessor' should be posting some pics here soon.


 |
|
| Back to top |
|
|
|
|
|
|
|
|
|
|
|
|
You cannot post new topics in this forum
You cannot reply to topics in this forum
You cannot edit your posts in this forum
You cannot delete your posts in this forum
You cannot vote in polls in this forum
|
|
|
|
|
|
|
|