|
 |
|
 |
|
| Author |
Message |
BeastMaster
Community Member

Joined: 19 Jul 2007
Posts: 994
Location: UK
|
 Posted: Mon Feb 02, 2009 4:56 pm Post subject: Posted: Mon Feb 02, 2009 4:56 pm Post subject: |
 |
|
cheers andy 
taking a blaster break for now after destroying part of the bulldog frame trying to get some screws in  will need to rebuild it again. though next update will be a biggie will need to rebuild it again. though next update will be a biggie 
_________________
"F*ck it, it's just a movie. Let him worry about it" Harrison Ford |
|
| Back to top |
|
|
|
|
 |
|
 |
|
|
|
|
| Author |
Message |
BeastMaster
Community Member
Joined: 19 Jul 2007
Posts: 994
Location: UK
|
| Posted: Sun Mar 08, 2009 7:48 pm Post subject: |
|
|
| BeastMaster wrote: | cheers andy
taking a blaster break for now after destroying part of the bulldog frame trying to get some screws in will need to rebuild it again. though next update will be a biggie |
ok fixed all that! 
as this is a 2006 sidkit I've had to completely modify the bolt lever mechanism to work the same as the WC. its been a hell of a job and still doesnt completely open like the WC, though it's the best I could do with the mechanism. I'd be interested to see how sids WC bolt lever mechanism opens (anyone?)
I also screwed in the barrel to the bulldog frame as I figured epoxy glue just wouldn't be strong enough.
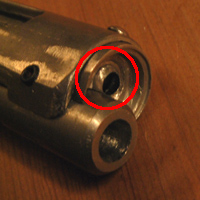
also added this casting of a round nut to the receiver end cap.
more updates soon.
_________________
"F*ck it, it's just a movie. Let him worry about it" Harrison Ford |
|
| Back to top |
|
|
|
|
|
|
|
|
|
|
|
| Author |
Message |
joberg
Community Member
.jpg)
Joined: 06 Oct 2008
Posts: 9447
|
| Posted: Mon Mar 09, 2009 6:59 am Post subject: |
|
|
Love the look of the round nut at the end of the receiver cap!!
Good thinking Beast; love the clean look of it. |
|
| Back to top |
|
|
|
|
|
|
|
|
|
|
|
| Author |
Message |
BeastMaster
Community Member
Joined: 19 Jul 2007
Posts: 994
Location: UK
|
| Posted: Mon Mar 09, 2009 3:46 pm Post subject: |
|
|
cheers joberg
it seems whenever I finish one modification a new one keeps popping up! 
_________________
"F*ck it, it's just a movie. Let him worry about it" Harrison Ford |
|
| Back to top |
|
|
|
|
|
|
|
|
|
|
|
| Author |
Message |
BeastMaster
Community Member
Joined: 19 Jul 2007
Posts: 994
Location: UK
|
| Posted: Thu Mar 19, 2009 6:08 pm Post subject: |
|
|
been adding alot of metal lately. here are my latest modifications with the bulldog handle and grip frame. I used the Tomenosuke pictures for reference:

_________________
"F*ck it, it's just a movie. Let him worry about it" Harrison Ford |
|
| Back to top |
|
|
|
|
|
|
|
|
|
|
|
| Author |
Message |
joberg
Community Member
Joined: 06 Oct 2008
Posts: 9447
|
| Posted: Fri Mar 20, 2009 6:08 am Post subject: |
|
|
| Keep up the good work Beast! |
|
| Back to top |
|
|
|
|
|
|
|
|
|
|
|
| Author |
Message |
hirohawa
Community Member

Joined: 18 May 2006
Posts: 1067
|
| Posted: Sat Mar 21, 2009 1:40 pm Post subject: |
|
|
| PM sent with a question. |
|
| Back to top |
|
|
|
|
|
|
|
|
|
|
|
| Author |
Message |
kurtyboy
Community Member

Joined: 01 Jan 2009
Posts: 319
|
| Posted: Sun Mar 22, 2009 6:02 pm Post subject: |
|
|
Superlative work! Puts my efforts to shame.
And thanks with all your help so far Ed. |
|
| Back to top |
|
|
|
|
|
|
|
|
|
|
|
| Author |
Message |
BeastMaster
Community Member
Joined: 19 Jul 2007
Posts: 994
Location: UK
|
| Posted: Mon Mar 23, 2009 6:26 pm Post subject: |
|
|
cheers guys
work is going at a snails pace with this project as any time I get to do major modifications is sucked up by smaller things like this:
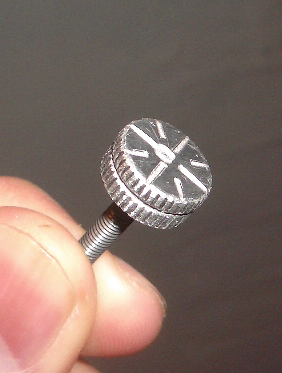
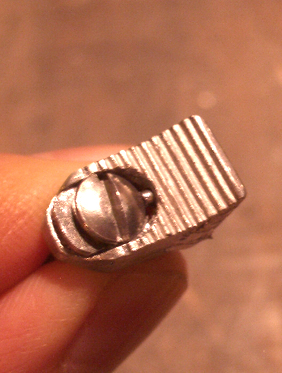
I modded up a casting of a weaver I got from OB. basically split it in two peices and sharpened up the details, embeding an allen screw at the bottom hidden with a layer of metal. I was going to buy a real weaver knob I saw earlier today, though this one looks good enough for now.
_________________
"F*ck it, it's just a movie. Let him worry about it" Harrison Ford |
|
| Back to top |
|
|
|
|
|
|
|
|
|
|
|
| Author |
Message |
BeastMaster
Community Member
Joined: 19 Jul 2007
Posts: 994
Location: UK
|
| Posted: Tue Mar 24, 2009 6:12 pm Post subject: |
|
|
more tid-bits:
_________________
"F*ck it, it's just a movie. Let him worry about it" Harrison Ford |
|
| Back to top |
|
|
|
|
|
|
|
|
|
|
|
| Author |
Message |
kurtyboy
Community Member
Joined: 01 Jan 2009
Posts: 319
|
| Posted: Tue Mar 24, 2009 7:50 pm Post subject: |
|
|
| Nice! What exactly did you put in there? You spoke of a washer... |
|
| Back to top |
|
|
|
|
|
|
|
|
|
|
|
| Author |
Message |
RelicMaker
Community Member
Joined: 11 Sep 2006
Posts: 11
Location: Texas
|
| Posted: Wed Mar 25, 2009 9:37 am Post subject: |
|
|
| BeastMaster wrote: | more tid-bits:
|
What mod did you do here? Also what kind of screw are you using there?
_________________
 |
|
| Back to top |
|
|
|
|
|
|
|
|
|
|
|
| Author |
Message |
BeastMaster
Community Member
Joined: 19 Jul 2007
Posts: 994
Location: UK
|
| Posted: Wed Mar 25, 2009 10:15 am Post subject: |
|
|
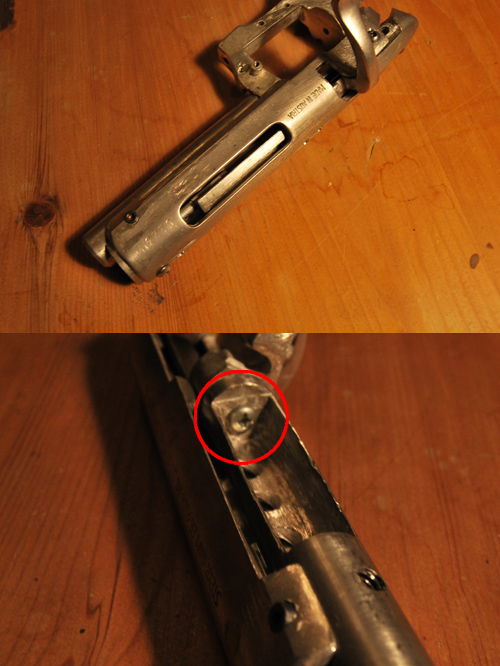
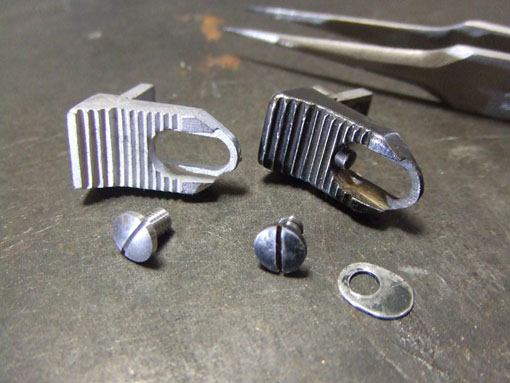
the switch was a 2006 sidkit switch which is alot different to the wc, so I re-shaped it. I've actually added a bigger bit of rod now from a nail, and the plate under the screw was cut from steel sheeting. the screw is around 6mm diameter.
some references from the tomenosuke blog:
_________________
"F*ck it, it's just a movie. Let him worry about it" Harrison Ford |
|
| Back to top |
|
|
|
|
|
|
|
|
|
|
|
| Author |
Message |
BeastMaster
Community Member
Joined: 19 Jul 2007
Posts: 994
Location: UK
|
| Posted: Thu Mar 26, 2009 5:11 pm Post subject: |
|
|
got the trigger mechanism set up and it works great! I created grub grews for all insertion rods just to eliminate the glue factor. I reshaped the safety switch again and added a smaller screw. this also holds the bullet chamber properly secure now after fiddling with the mechanism.
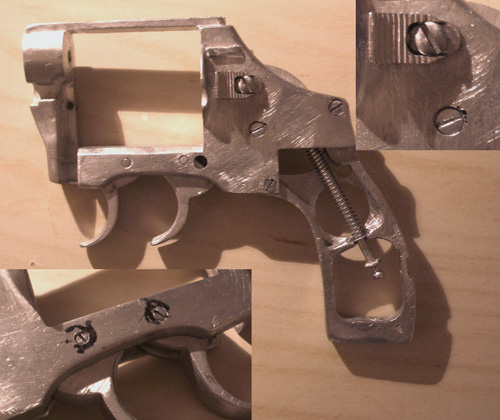
so the mods and build up are pretty much done. all I need to do now is to engrave the numbers and symbols (something which I am dreading) and shine everything up ready for blueing and painting. so another couple of months I reackon
_________________
"F*ck it, it's just a movie. Let him worry about it" Harrison Ford |
|
| Back to top |
|
|
|
|
|
|
|
|
|
|
|
| Author |
Message |
RelicMaker
Community Member
Joined: 11 Sep 2006
Posts: 11
Location: Texas
|
| Posted: Fri Mar 27, 2009 7:15 am Post subject: |
|
|
| BeastMaster wrote: | the switch was a 2006 sidkit switch which is alot different to the wc, so I re-shaped it. I've actually added a bigger bit of rod now from a nail, and the plate under the screw was cut from steel sheeting. the screw is around 6mm diameter.
some references from the tomenosuke blog:
|
I've been looking for this screw. Any idea exactly what it's called or identified as? Like the type of head shape and length?
_________________
|
|
| Back to top |
|
|
|
|
|
|
|
|
|
|
|
| Author |
Message |
BeastMaster
Community Member
Joined: 19 Jul 2007
Posts: 994
Location: UK
|
| Posted: Fri Mar 27, 2009 7:44 am Post subject: |
|
|
round head or button head slot screw I think. around 4 or 5mm in head diameter. mine still isn't totaly correct, but thats a case with most of this blaster, so not too bothered.
_________________
"F*ck it, it's just a movie. Let him worry about it" Harrison Ford |
|
| Back to top |
|
|
|
|
|
|
|
|
|
|
|
| Author |
Message |
andy
Community Guide

Joined: 01 Nov 2006
Posts: 6237
Location: Rochester, NY
|
| Posted: Fri Mar 27, 2009 9:41 am Post subject: |
|
|
I do have an extra original screw and washer for this. It is far too short to fit through a thicker Sidkit release switch though.
Andy |
|
| Back to top |
|
|
|
|
|
|
|
|
|
|
|
| Author |
Message |
joberg
Community Member
Joined: 06 Oct 2008
Posts: 9447
|
| Posted: Fri Mar 27, 2009 11:43 am Post subject: |
|
|
| It's a work of love Beast, so take your time...so far all the tweaking is been great; eager to see the finish product. |
|
| Back to top |
|
|
|
|
|
|
|
|
|
|
|
| Author |
Message |
RelicMaker
Community Member
Joined: 11 Sep 2006
Posts: 11
Location: Texas
|
| Posted: Mon Mar 30, 2009 4:15 pm Post subject: |
|
|
| andy wrote: | I do have an extra original screw and washer for this. It is far too short to fit through a thicker Sidkit release switch though.
Andy |
I'm interested in getting this from you! PM sent!
_________________
|
|
| Back to top |
|
|
|
|
|
|
|
|
|
|
|
| Author |
Message |
BeastMaster
Community Member
Joined: 19 Jul 2007
Posts: 994
Location: UK
|
| Posted: Fri Apr 24, 2009 6:33 am Post subject: |
|
|
just when I thought anything else couldnt go wrong with this (so much has done so far) I got all the parts nice a clean for the paint job. This has been a complete disaster as the finish was pretty poor due to me not priming the parts first and using this metal paint which was giving me a bit of an orange peel texture.
so now I have to figure out how to strip this crap off and without using anything that could potentially melt the milliput areas I filled in.
and I thought painting would be the easy part!
_________________
"F*ck it, it's just a movie. Let him worry about it" Harrison Ford |
|
| Back to top |
|
|
|
|
|
|
|
|
|
|
|
|
You cannot post new topics in this forum
You cannot reply to topics in this forum
You cannot edit your posts in this forum
You cannot delete your posts in this forum
You cannot vote in polls in this forum
|
|
|
|
|
|
|
|